
Hey there! I meant to post last week as I’d already missed the previous week when I took a short break away in Wales (weather was a bit pants, unfortunately ), but life got in the way as it often can, so now it’s time to get back on track to send lots of sewing/style and inspiration your way.
Today’s project was inspired by a sewing challenge on Instagram that I decided to take part in. The challenge is called the Flashback Sewing Challenge (#flashbacksewingchallenge) and is hosted by two lovely ladies…Faith @faithstjules and Michele @winmichele. The idea of the challenge is to create a garment or outfit inspired by your favourite period in history. You can use a vintage pattern or a current pattern as long as your finished make is inspired by the period that you choose. I love a challenge that has looser, more relaxed guidelines rather than based around a specific garment style or pattern. That way I can create to suit my own style and lifestyle needs.
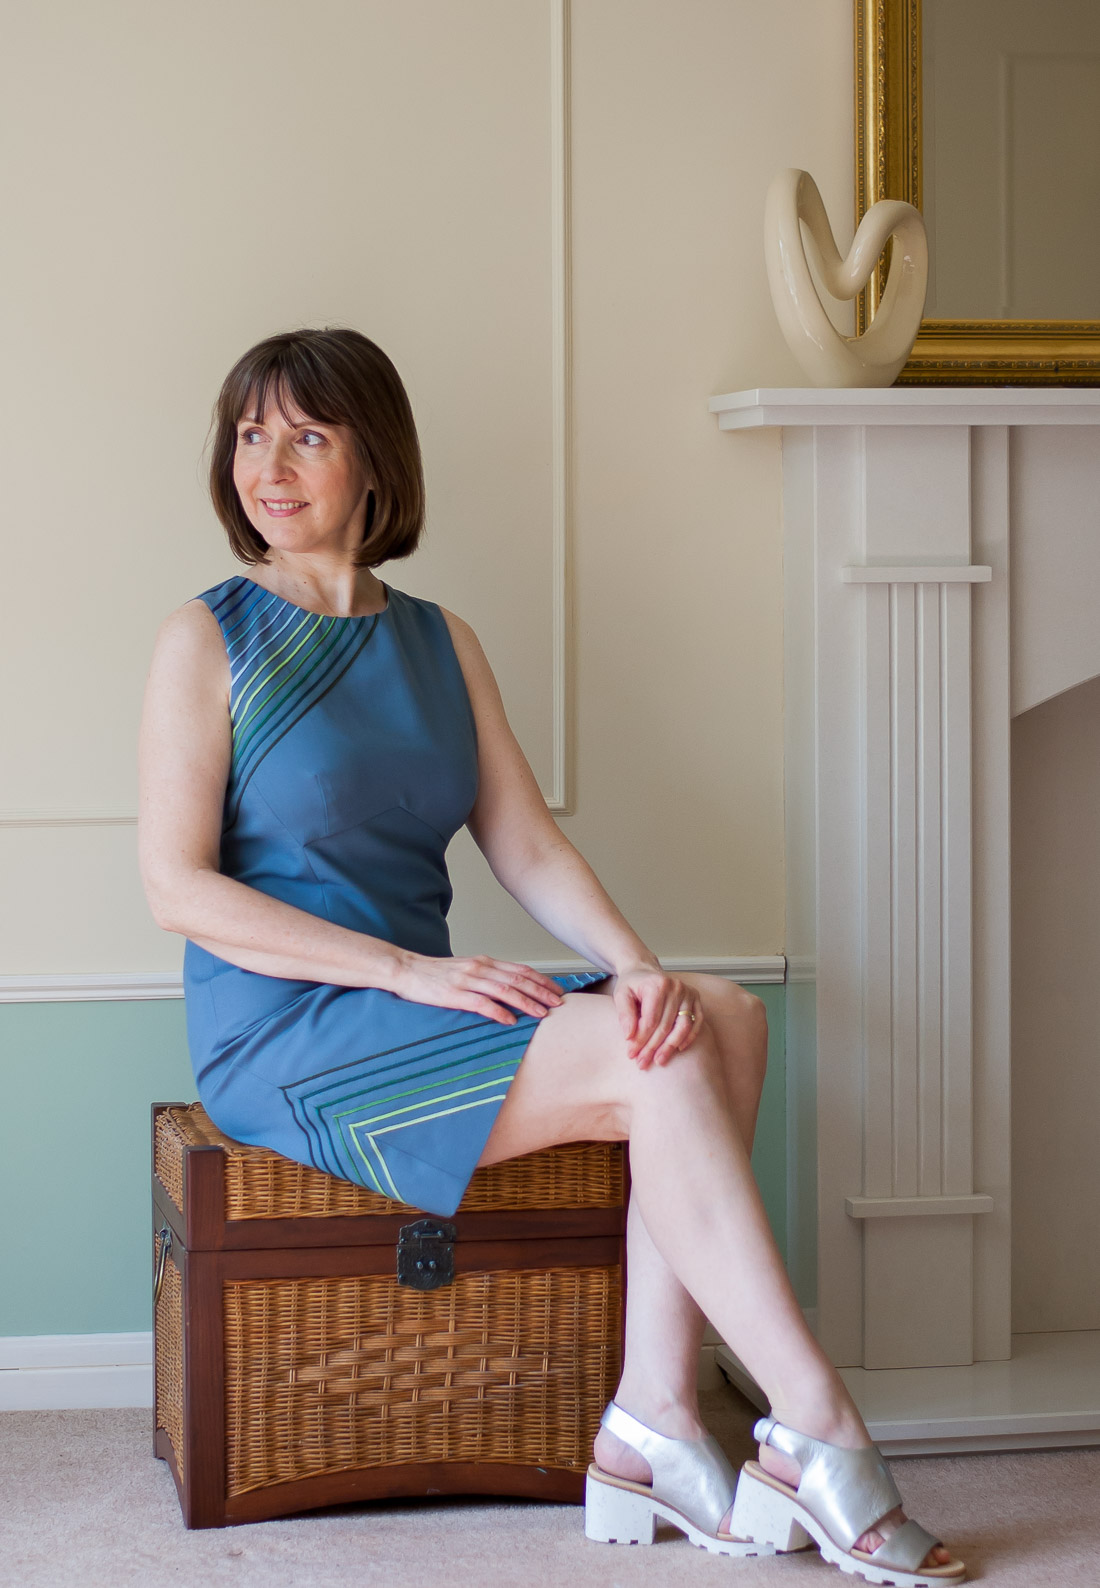
DIY ’60s Style Dress
I’m very fond of the ’60s and ’70s and after a rummage through my patterns, I found a vintage copy of Vogue 1809 by DKNY that had been given to me by my mum some time ago. The sheath dress shape looked ideal for something with a ‘60s vibe. I think the pattern was issued in 1995 and has three different style variations for a strappy sundress, a classic sheath and a sheath with interesting angled empire line at the centre with dart detail. It’s possible you could track the pattern down on eBay if you felt inclined to try and get hold of it.
Once the pattern had been decided on, as luck would have it I had a length of airforce blue lightweight wool challis (bought from Clothspot) in my stash which was just enough for the dress. I say just enough…and it really was…only just enough without any room for error whatsoever. As a result, I decided to play it safe and make a toile so I could be spot on with size and fit before I cut out.
I decided on using the style with the centre empire line panel and I cut on a size 14. Only a few fairly minor alterations were needed. I lengthened the back armscye, straightened the back shoulder slope, took in some width through the midriff darts and narrowed down the front neck width. I also made the sides very slightly ‘A’ line in line with the ‘60s sheath style that I was after. Once I’d perfected the toile fit I was able to transfer my alteration lines and after unpicking half of it was able to cut out safe in the knowledge I wasn’t risking my fabric.

Adding Pizazz
Soooo, as you know I just love to play around with the design ideas and with my dead plain fabric and simple silhouette, some extra pizazz was definitely needed. At first, I was considering some addition of another fabric in bands of colour and then the idea of some kind of applied detail. Somehow after going down several internet rabbit holes, I ended up on eBay looking at brightly coloured Soutache braid. I found an eBay shop that sold the braid in colour groups of 6 shades and l immediately loved them, so I ordered 6x1m lengths of blue tones and 6x1m lengths of greens. After playing around with braid placement I loved how angles and chevrons looked and planned out an asymmetric design.
Trials And Tribulations With Soutache
Attaching the braid wasn’t without its trials and tribulations and with a good dose of swearing thrown in for good measure! After drawing out attachment lines with a chalk pencil I decided that using Wondertape to anchor the braid down before stitching on the machine was a good idea…and it was…in practice, except that I had to try and dissolve the Wondertape by dunking the dress in warm water. This didn’t really work very well and the braid felt stiff afterwards so I ended up unpicking quite a bit of it then re-dunking the braid on its own to remove excess glue and then I sewed it back on by hand. Oh, hindsight you are a wonderful thing! Lol! Anyhoo, if I were to do this again I would definitely hand sew the lot. We live and learn eh?

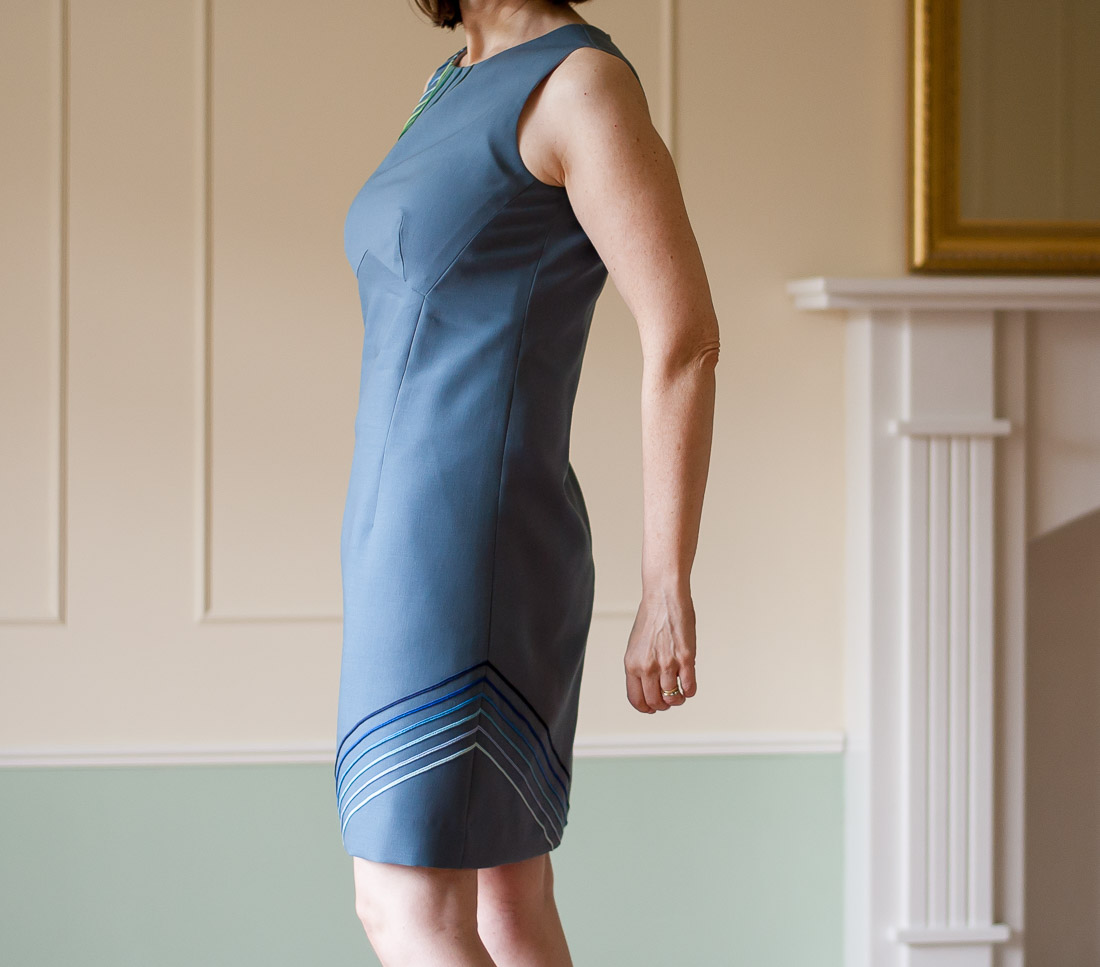

Once the braid was attached I was able to stitch the side seams together and finish construction. There’s a concealed zip at the back and I used a fine cotton lawn to completely line the dress right up to the neck and armhole edges to avoid the bulk of facings. The cotton lining makes the dress feel lovely and cool to wear.
I’m so pleased with the fit of my dress. It really is a well-drafted pattern and I’ll definitely use it again. I know I’m not the only blogger that loves it. Sarah of Goodbye Valentino made this lovely white version and Lucy of My Love Affair With Sewing has made several versions. Go and take a look!


I couldn’t wait to pair my dress with my latest sandal purchase. The silver sandals that I’m wearing are by Clarks and are the same style as the mustard ones that I wore here and man are they comfy! I also have some silver sneakers that I bet would create a great casual look with my dress too (maybe a denim jacket with it as well)….how would you style this dress? And have you ever used some braid to embellish a make? Let me know in the comments and we can have a chat.
As always, thanks for stopping by, you know how much it means to me. I hope to see you soon. Till then, bye!

Pin For Later


Diane, this dress is just perfect! The fit, obviously, as it shows that making a toile really pays off. The colour is very unique and gives vintage vibes itself. The pattern, its simple shape but with the “W” front seaming is such a quiet but definite statement. The cording…the cording! What a fabulous idea and execution, thanks for sharing the process. You are absolutely glowing and graceful in these photos!
Author
Ahhh, Sil, you’ve totally made my day with that lovely comment. Thank you, sweet lady, xx
I have attached braiding and ribbon in the past and I had a braiding foot for the machine which made it easy. For every machine I have had since I have bought a braiding foot. Most brands (certainly Brother, Janome, Husqvarna and Bernina which I have all had) make a braiding foot. I mostly use braiding for craft projects now as I find it difficult to source good quality braiding/ribbon that is worth adding to a garment.
Your dress is lovely and certainly have a 1960ties vibe to it because of fabric and colour. Very interesting cut reminds me more of the 50ties than the 90ties.
I really like your idea of wearing trainers with the dress. Combined with a denim, corduroy or leather bomber jacket would dress it down and be fun.
Author
Thank you Sis! Can you believe that in all the long years that I’ve sewn I’ve never bought many specialised feet for my machines??? I think it’s about time I did. The braiding foot sounds intriguing. But you’re right, it’s difficult to find the kinds of braid that would look good on a garment.
Loving the idea of a leather jacket over my dress by the way…I have some lovely faux leather that I keep meaning to make up…I even bought a Teflon foot so I must be keen…lol!
Wow, Diane, this is such a beautiful dress! I love how you describe your process and all the work you put in it. And the result is absolutely stunning! Wis xx
Author
Aww, cheers Wis. Thank you so much. I’m thrilled you like my dress x
I love a good shift dress and this one is great, the braid color accent really add some interest. Fantastic.
Author
Thanks ever so much Beth! I’m really pleased with how the braid worked out…glad you like it 🙂
Ah I did ‘wonder’ if you’d used Wonder Tape … you did an immaculate job in the end; such an interesting detail x
Author
Thanks Sarah x. Yes, the Wonder Tape that proved not so wonderful when used how I used it! I’ll keep it strictly for zips in future.
Cute pattern and the braid detail is wonderful! I attached braid once to the front of a dress using my special Bernina foot. Even with the foot, it was so hard to keep in place, so I used wonder tape to do so, and had the very same problem you did…it wouldn’t dissolve! But your final dress is so beautiful – – worth the agony:)
Author
Thanks so much, Linda. Hmm, it seems that braid can be a tricky customer eh? But yes, worth the agony!
Diane, this is so beautiful and perfect for the 60’s. The addition of the braid is such a perfect touch. Excellent job.
Author
Ohh, thanks Lori!
Oh mu goodness, your dress is amazing!! I LOVE the shaping on the bodice, and the braiding is fabulous. You did a brilliant job with it, happy wearing!!
Author
Aww, that’s so lovely of you, thanks, Lynne x
I just love the dress and it’s a wonderful fit xx
Author
That’s so kind of you Brenda. Thanks! xx
This is lovely! A lot of work I can imagine, but so worth it!
Author
Thank you so much, Linda!