
Here’s another dress to show you. It seems like I’m on a roll with these Summer dresses on my blog and as there’s still a few weeks of Summer left (even though as I write this it’s turned windy and showery here in the UK) I thought I should get my butt into gear and get my last one posted for your delight and delectation 🙂
Time to fess up though…this isn’t a recent make. No siree. I made my dress a good while back…maybe 18 months? It’s made from a gorgeous silk jacquard kimono fabric that was gifted to me by an online acquaintance. Originally, when I made the dress I changed the style for it to have raglan style sleeves with a cold-shoulder effect instead of the standard set-in sleeves on the pattern I used. Except it wasn’t all that successful and the sleeves always felt a bit tight and not overly comfy, which is why the dress never made it onto the blog.
Anyway, fast forward a year and I decided to chop off the sleeves and make it sleeveless. It was easy enough to do and I just finished the armhole off with a tiny bias binding…Much better! And comfier too. It got well and truly tested on my Greek holiday (plenty of room for yummy Greek food as well). So now and finally here I am showing it to you.

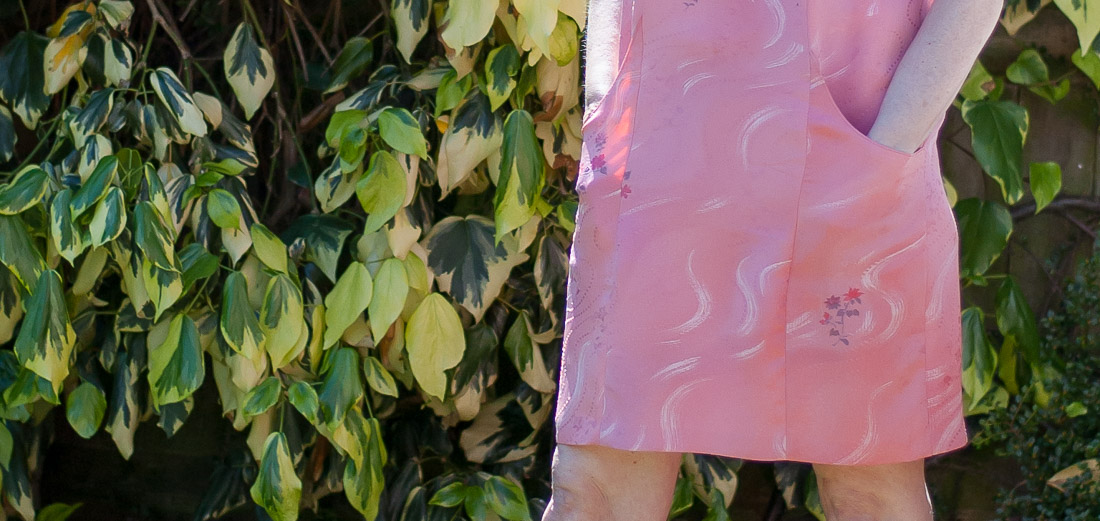

So here’s the pattern that I used (next photo). It’s an old pattern of mine, New Look 6207 and has been in my stash for a loooong time. It’s your average “bog-standard” (British colloquial term :)) princess seamed dress. I didn’t add a lining to it, I just finished the seams on my overlocker and added I used a regular lapped zipper at the back.

The one thing I did do though was to change those side front panels and add pockets. Because…well…pockets! It’s really straight-forward to do and here’s how:
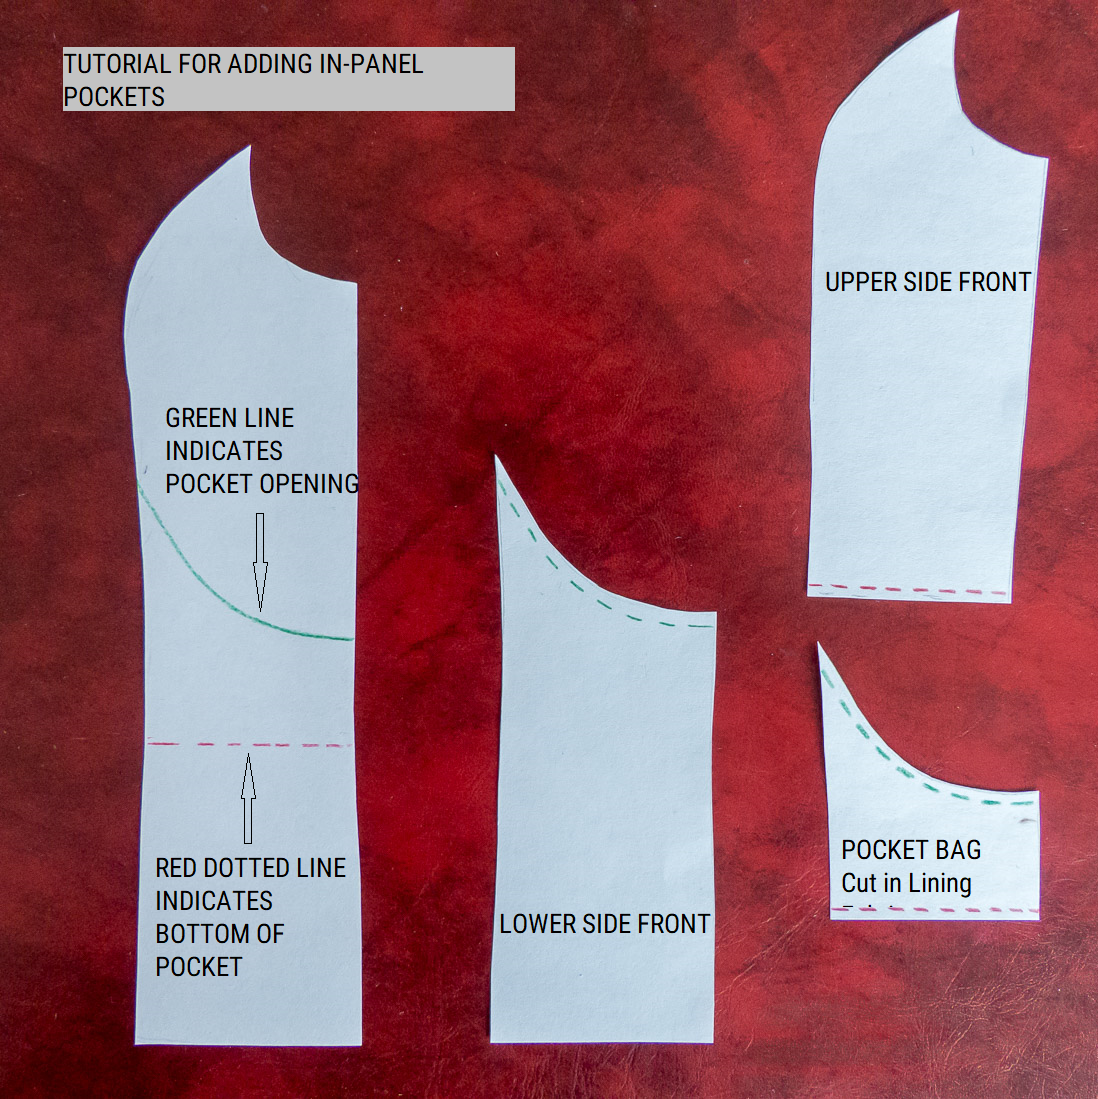
DIY Tutorial For In-Panel Pockets
- Firstly I got a side front panel and held it up to myself to just eyeball where I wanted my pocket to be. I held my hand in a comfy position as if it was in a pocket and I marked on my pattern piece where my wrist and my fingertips were.
- Next, I drew two lines on my pattern piece. The upper line indicates the pocket opening and the lower line is for the bottom of the pocket bag.
- I traced off the lower section of the pattern right to the upper line and added a seam allowance.
- I traced off the upper section down to the level of the bottom of the pocket bag and also added seam allowance here.
- I created a small pattern piece that went from the upper pocket line to the lower pocket line and added seam allowances at the top and bottom.
This photo illustrates all of the above points:
The sewing up is straight-forward too:
- Using the lower side panel piece, iron a narrow strip of interfacing or iron-on seam tape along the upper edge to stop any stretching. Stitch the small lining piece to this upper edge and then clip, understitch and fold to the inside of the dress to press.
- Next, line up the lower edge of the upper side panel with the bottom of the pocket bag, stitch and overlock/serge.
- Baste down each side of the pocket areas and now continue to make up the rest of the dress as per pattern instructions.
And that’s it…a quick and easy way to add in-panel pockets to any panelled dress.


I hope you found this tutorial handy and if you did, feel free to share it.
PS I wrote about a different kind of dress pocket here
Thanks for reading! Catch you soon

Pin For Later


LOVE!!! Thank you for this tutorial as what could be better than princess seams + pockets!!! Your dress is so pretty, love the color on you. 🙂
Author
Thank you so much, Lisa! It makes me very happy to hear how much you enjoyed my tutorial xx
These pockets are a lovely addition to the dress! Huge thank you for the straight-forward tutorial. I think I can do this! There is an old margarine advertising jingle that comes to mind: “Everything is better with Blue Bonnet on it.” I’m changing it to “every dress is better with a pocket on it”!
Author
Thanks, Karen!I’m glad to hear that my tutorial is straightforward, that’s music to my ears.
Hehe, I love that rhyme!
This is a helpful tutorial. Any garment that you can add pockets to is fantastic!
Author
Thank you, Tammy!I’m so pleased that you find my tutorial handy 🙂
Lovely dress, Diane, and clever pocket placement. I can imagine this was the perfect vacation dress! Nice you found a new way to enjoy an older make!
Author
Thanks, Linda! Yes, it’s one of my fave holiday dresses 🙂
Hi!
Would you happen to have photos of the process of sewing the pocket bags onto the dress? I am trying to sew Lekala 4356 which has these type of pockets. However, the instructions are non-existent! 🙂
Thanks very much and I love your dress!
Author
Hi Rori,
Well as I memtioned in the post above it’s all just stitched into the seams each side of the panel, but I can snap a quick photo of the inside of the dress for you if you think it will help? Drop me an email using the contact form and I’ll pop the photo in an email for you. It might be tomorrow morning though before I can get back to you 😊
This is exactly what. Want to do for a fall dress with long sleeves on a comfy French terry or Ponte knit with long sleeves. Unless someone can advice me on a pattern that already has this look
Author
A Fall dress would be lovely, Bonnie. At the moment a suitable pattern to use doesn’t come to mind, but I’ll have a think. Though you may be able to find a basic long-sleeved princess-seamed shift to adapt?
Very useful tutorial, thank you. One question, which way did you press your princess seams especially where the pocket is?
Author
Thanks, Wendy! I couldn’t for the life of me remember so I just went to the closet where my summer clothes are and checked. Apparently, I’ve pressed all seams open with each side overclocked separately. My fabric is quite lightweight and there’s just lining on the front piece of the pocket so it’s not bulky at all.