
Not a very Summery make for you today but a useful one nonetheless in the form of the ubiquitous Hudson pants by True Bias.
Now this might sound odd, but can you believe I’ve only ever owned one pair of jogger-style pants before?? I know right? A couple of my online sewing friends love these pants and find them to be a useful wardrobe addition. I decided that I had to have a pair and that they’d fit right in with my elevated casual wardrobe if I dressed them up a tad.
Deciding Which Pattern To Choose
I came across an IG story by @thecrookedhem where she compared the drafting of Hudsons by True Bias and the Mels by Seamwork. I found it to be really useful in helping me to decide which was best for my shape and ultimately I chose the Hudsons which seemed suited to my own crotch curve shape. The front curve is straighter (I always make my front crotch curves straighter) and I also liked the pocket edging on the Hudsons.
I had some olive ponte knit from Croft Mill in my stash and decided to use it, but not after I’d done a mock-up in a spare bit of navy (a colour I never wear) ponte in a similar weight and stretch. I’m glad I did this because I did need to do some adjustments and I realised that my fabric had more stretch in it than the recommended amount of 25% mentioned in the instructions.
I ended up sizing down due to the increased stretch of my fabric. I also raised the waistline about an inch (2.5cm). Not only that though, the legs felt a bit wide, so I decided to slim them down a little too.
Wait, there’s more. And I think it’s also down to the more stretchy nature of my fabric…but I had odd draglines down my legs at the back and ultimately I made the executive decision to add seams down the back legs. This is a tip I got from @sewitwithdi who often uses a back pant seam to create a better fit over the bottom and calves. I know that I stand with my bottom tucked under and my knees locked and calves pushed back…terrible posture I know and it plays havoc with pants fit for me. I must stand better!
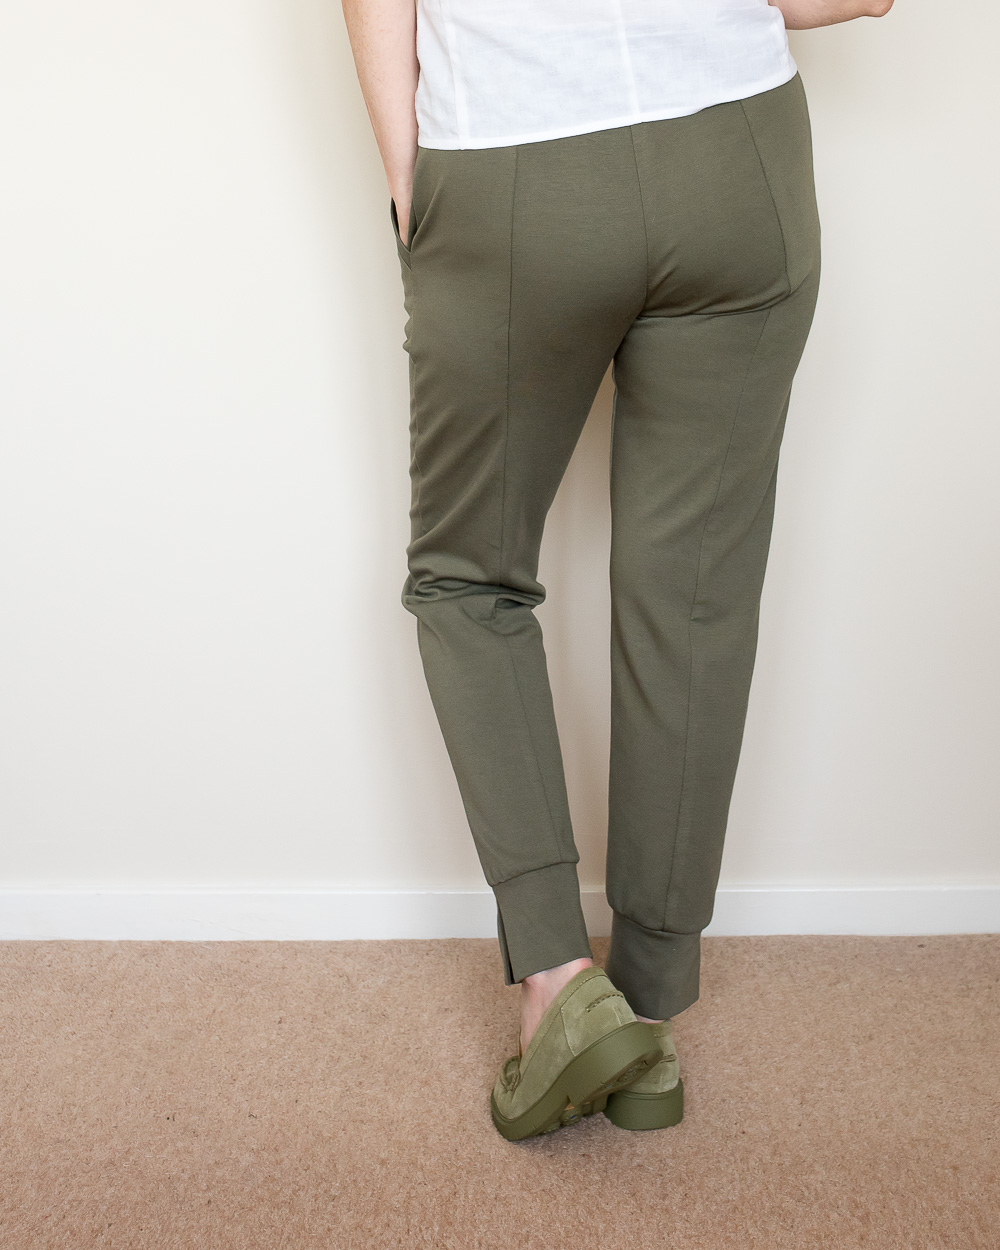
Anyhoo. These alterations seem to have done the trick, particularly where I added a bit of shaping at the back of the calf to stop the fabric from dragging backwards from above the front shin areas and I’m pretty happy with the result. I went with the usual cuffed hems as you can see, but just made a side slit so that they didn’t grab my calves when I sat down.


Overall I like this make but I would change a couple of things if I made another pair (and I do have one planned). Firstly, I would choose a slightly more stable knit. I was hoping for something a tiny bit firmer when I received my fabric. Don’t get me wrong, it is a lovely fabric but may be more suited to cardigans or tops. And secondly, I would just add my pocket edge banding as normal but leave out one layer of pocket bag and stitch the main pocket piece to the actual front pant following the curve of the pocket bag. The stitching would be visible, but I feel like this would reduce bulk nicely. I could always make the inside edge of the pocket band pretty with a little bit of thin binding. Here is what the pockets are like now:


Now that I have the adjustments all marked onto my pattern and the two back legs drawn out with added seams I can definitely use it again and know the fit would be good. I might even try an uncuffed version with ankle zips too.
Tell me have you sewn the Hudsons? They can be great casual or lounging garments. Tell me in the comments.
Next time I’m back to full-on Summer sewing and I have some holiday outfits to share over the next couple of posts. See you soon!


I haven’t sewn this pattern, however I was drawn to the slit in the cuff, thinking it was a pattern feature…only to find it was one of your changes 😆 . I do like your added feature! (Though would hope not to have to go through all the other changes )
Author
Ahh, yes…that slit’s my little added extra. and I hope for your sake that you don’t have all of the changes to make like me. My flat bottom, bad posture and thick waist make for a lot of changes! Yet I wear pants a lot so I have to grit my teeth and do them.
Yes, my ‘crop’ of Hudson’s are getting a bit tired now, though. I like how you did the cuff!
Author
Thank you! Oh I like that term for a group of Hudsons…I expect I’ll have a crop sooner or later 🙂
Great looking jogger that is SO flattering on you, Diane!
Sadly, I think my posture is virtually identical to yours, so all of those changes will be necessary for me in a jogger style like these Hudsons. You mentioned also raising the waist an inch, yet your finished waist is def not hi-rise. I think your back fit looks great in the bottom area and in the legs after adding fitting seams… I do get that a firmer fabric in this style would be more in line w/ ‘elevated casual’, but these are lovely joggers still. And useful suggestion on pocket bulk!
Author
Thanks for the kind words, Joan. Yes, I didn’t take the new waistline too high and as always I dip it a little at the front (on these the elastic at the front goes just across my stomach in the perfect place so that it just holds me in 🙂 ). I think I added an inch or so in total.
And re-fabric. I’ve worn these a couple of times already since writing this post and they feel great so I probably don’t need to go any firmer, maybe just a little thicker.
Looks good! Question – Do you draft back leg pattern pieces? Or sew down the center with existing back let piecex? Thanks..
Author
Thank you Heather. No I didn’t redraft back legs. I used the existing pattern. I marked the centre of the leg at the hemline and following the grainline I drew a line down the pattern. Then I cut it through, traced off the two pieces and added seam allowances but then I also did the shaping that I needed along those seamlines…I curved in a little bit under the bottom area and then curved out a bit at the calf area. I have a video link from YouTube for you which gives you and idea of the process(it’s an old video but still relevant) https://www.youtube.com/watch?v=mywTxfQKl5k&t=2s
Hope this helps x
I love the addition of the slit in the cuff. I think the draglines you describe are as a result of the drafting rather than your posture. I have to raise my waist by a lot on these, they are drafted very low. Your hudsons are really lovely, much nicer than any I’ve managed to produce.
Author
Thanks ever so much, Sue! Hmm, maybe you’re right, it could be the drafting. And I think you’re taller than me so I’m not surprised you have to raise the waistline a lot