
I went diving into my stash for this make and pulled out an olive green chunky cotton-blend knit. In the back of my mind, I’d had this idea floating around for quite some time, about a cardigan with pockets that had flaps and some type of D-ring/strap details. I sketched a rough design out on the back of an envelope, and slowly, my utility style cardigan plan came to life.
Can you guess what pattern I used? Yes, that’s right, the good old Marlo cardigan by True Bias. I’ve already made it twice (sadly, my original mustard version had to be cut off me when I broke my wrist, as it was way too painful to pull the sleeve down over it). So I was way overdue for another version. I already made some minor changes to the pattern, so I knew it would fit me without needing lots of try-ons. I like to narrow the sleeve and adjust the shoulder seams for my forward-rolling square shoulders.
The fabric I mentioned came from Pound Fabrics sometime last year (Minerva stocks it as well, and so do a few Etsy shops). It’s a very chunky 80% cotton/20%polyester blend with only mechanical stretch. I’ve already used this type of fabric 4 times, for two Vikisews Nikki sweaters, a Fibremood Griselda Sweater and a Marlo Cardigan. It can be challenging to work with, but when I first tried it out, I made lots of test swatches and worked out my preferred method. You can read about how I cope with it in this post
Sewing up this cardigan went quite smoothly. I won’t go into the finer details because I’ve covered it in my other Marlo posts, but once the main part was sewn, I could add the pockets and embellishments.
The plan was to make the pockets without the curved corners and a bit longer than the pocket pattern provided by True Bias, with the addition of flaps. I only just had enough fabric left to make them, so I couldn’t afford to make any mistakes, no pressure then! The first thing I did was to get the pocket placement planned. Next, I sewed the flaps, which were lined with a bit of cotton fabric. Then I thought about how I could use the grosgrain ribbon, which I bought from Petershams.
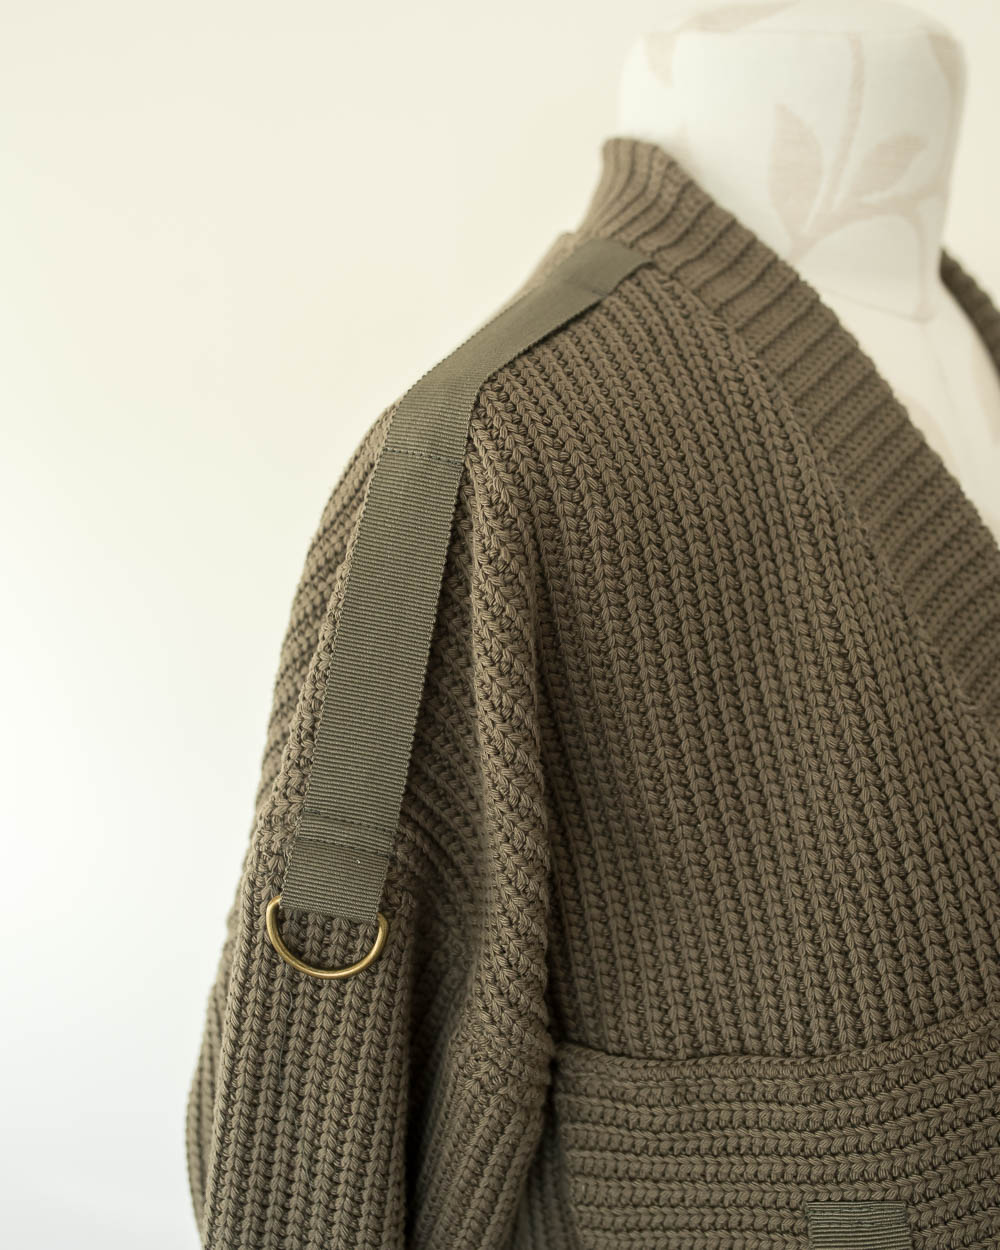
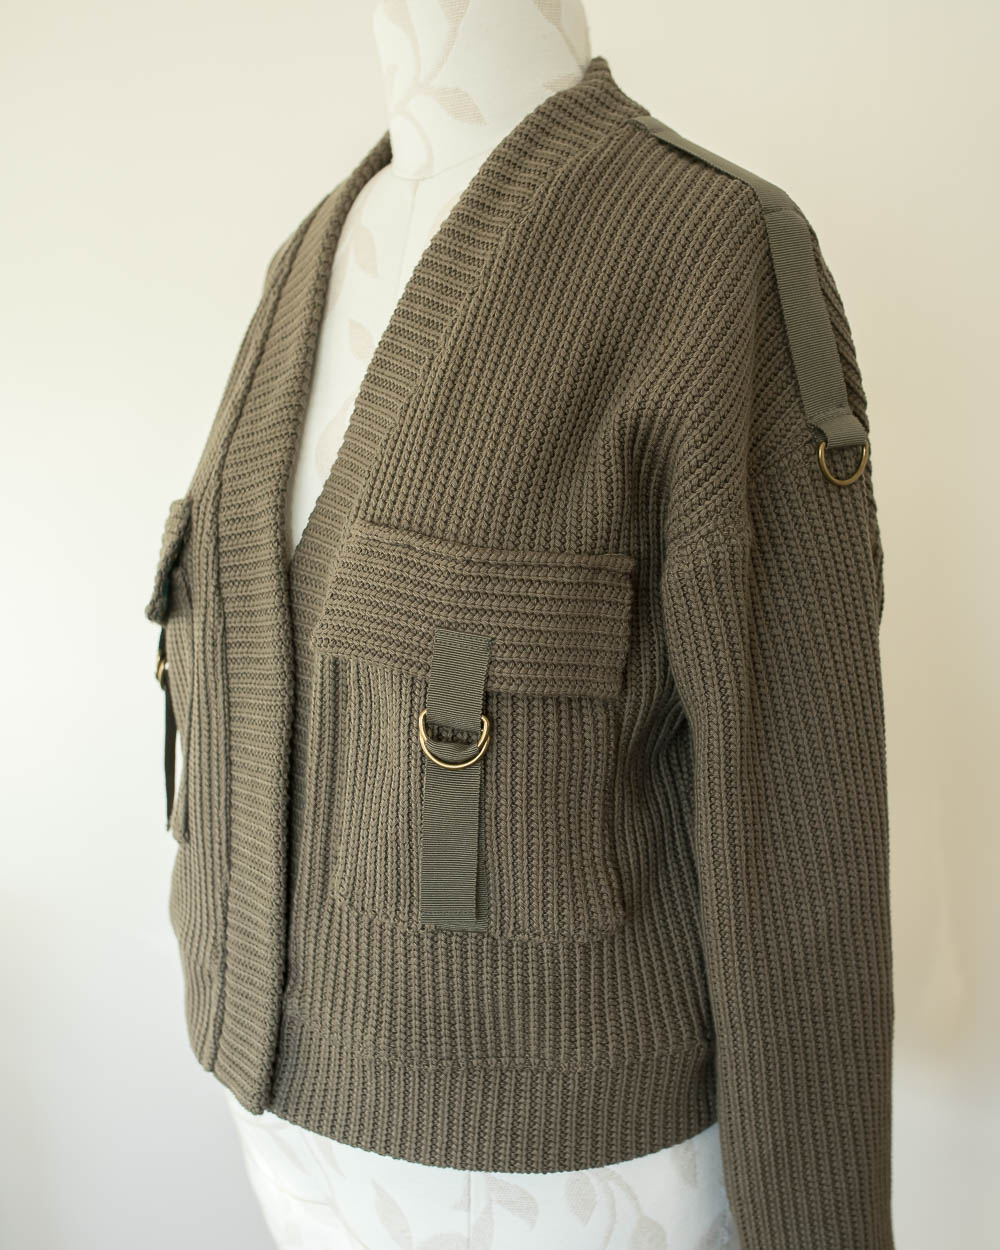
I came up with the idea of two D rings attached to the flaps and a strip of grosgrain sewn up the pocket bag that could be threaded through the D rings. I had to sew the ribbon onto the flaps and the pocket bags by machine before they were all attached to the main cardigan body by handsewing. I chose to hand sew the pockets on to be more accurate and avoid stretching the fabric.


After attaching the pockets, I felt like I wanted to add a little something to the shoulders as well, so I played around with various ideas and finally went with a simple strip of grosgrain with a D ring on the end of it so it looked a bit like epaulettes. I feel like this project really matches the ideas that were in my head, and I’m really chuffed with the finished effect of the added extras that give a bit of a utility/military vibe to my cardigan. It was so enjoyable to sew 🙂 I also think it will mix and match quite a few pieces in my wardrobe, which is a bonus and what wardrobe building is all about, don’t you think?.
Thanks for stopping by for a read. I always appreciate it.
See you soon!


What a unique and fun sweater! That fabric is stunning too.😁
Author
Thanks ever so much Heather! It is great fabric.
VERY fun cardigan, Diane! I love your play on military — a very ‘soft’ military style, but the reference is definitely there! The shoulder detail makes all the difference detail-wise.
I would like to try my hand with that heavy ribbed cotton, but it is too cold already in the upper MW of the U.S.!
It is our Thanksgiving / ‘Turkey Day’ today.
Author
Happy Thanksgiving Joan! Glad you like my cardi. I would agree on ‘soft’ military…😊
Enjoy your turkey…yum!