
As promised last week, it’s back to sewing today and I want to show you my new favourite winter make…a casual leopard print coat using Burda 114 08/16. I chose this style because I wanted a shorter length with more of a relaxed feel and this design ticks those boxes.
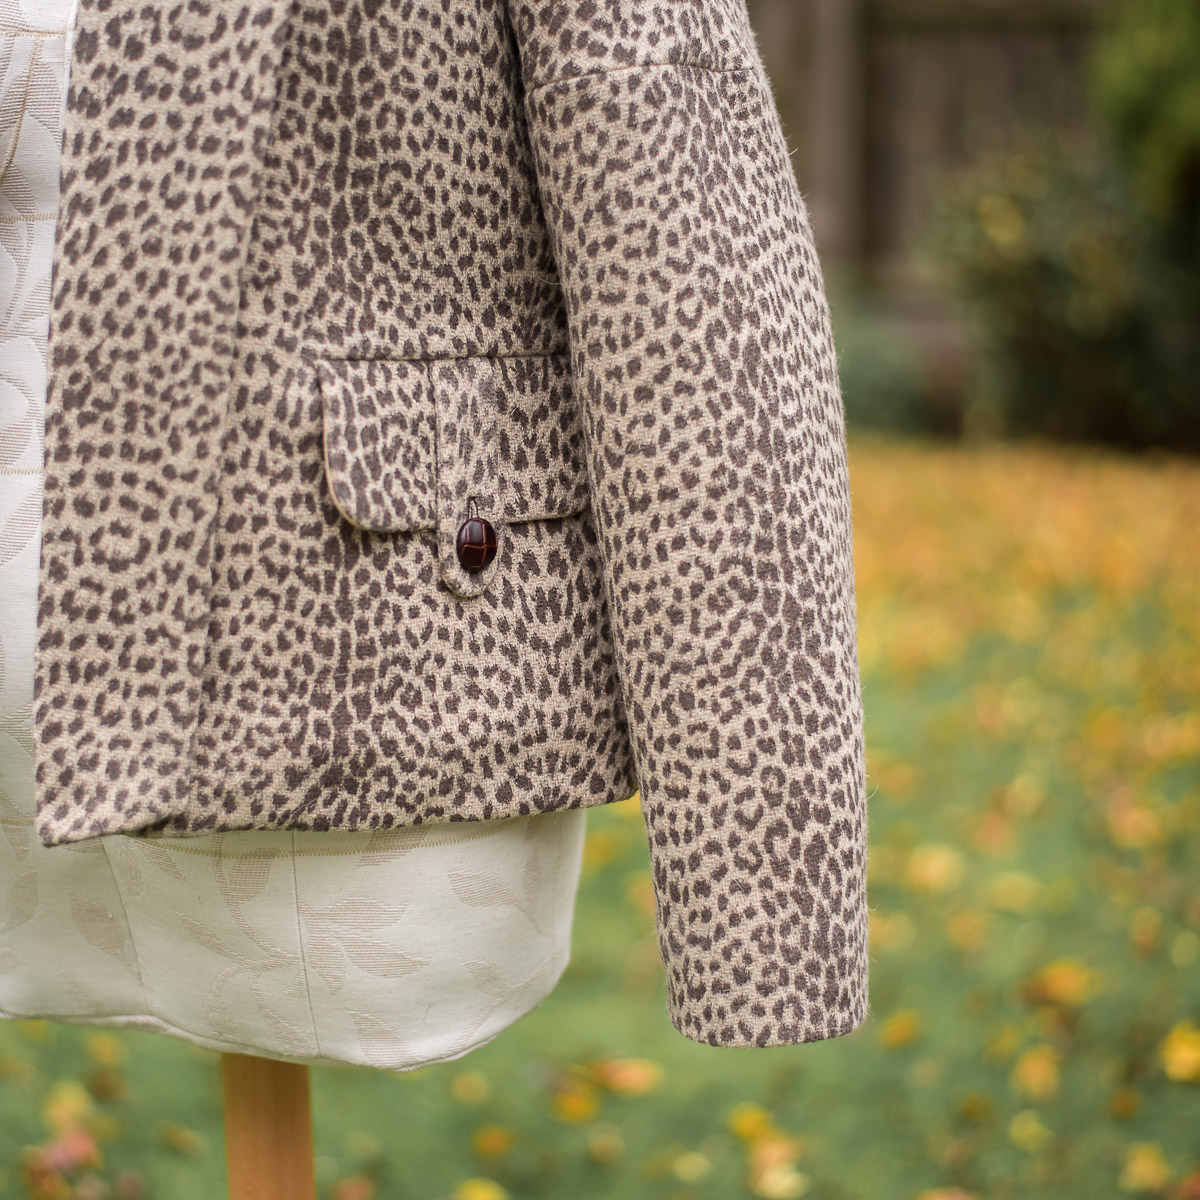
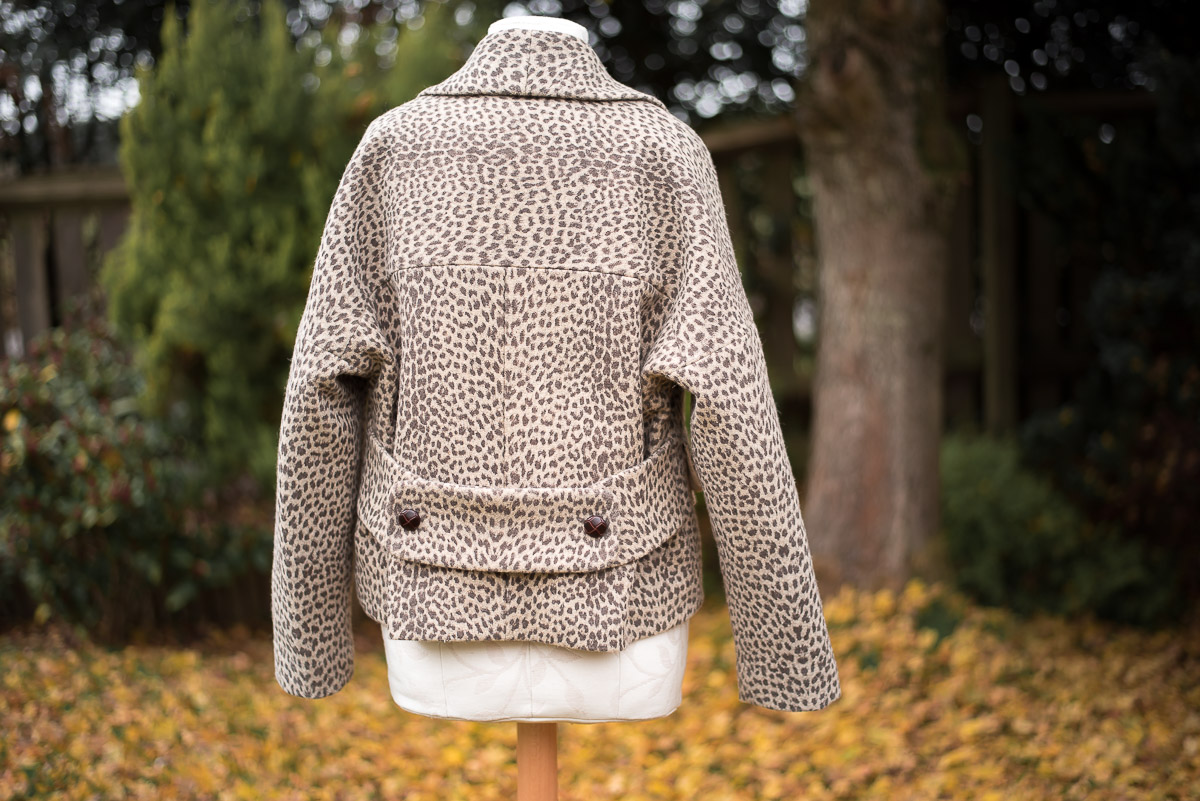
I love the fold-back collar and the dropped shoulders and who could not be bowled over by those gorgeous pockets and the cute back belt detail.
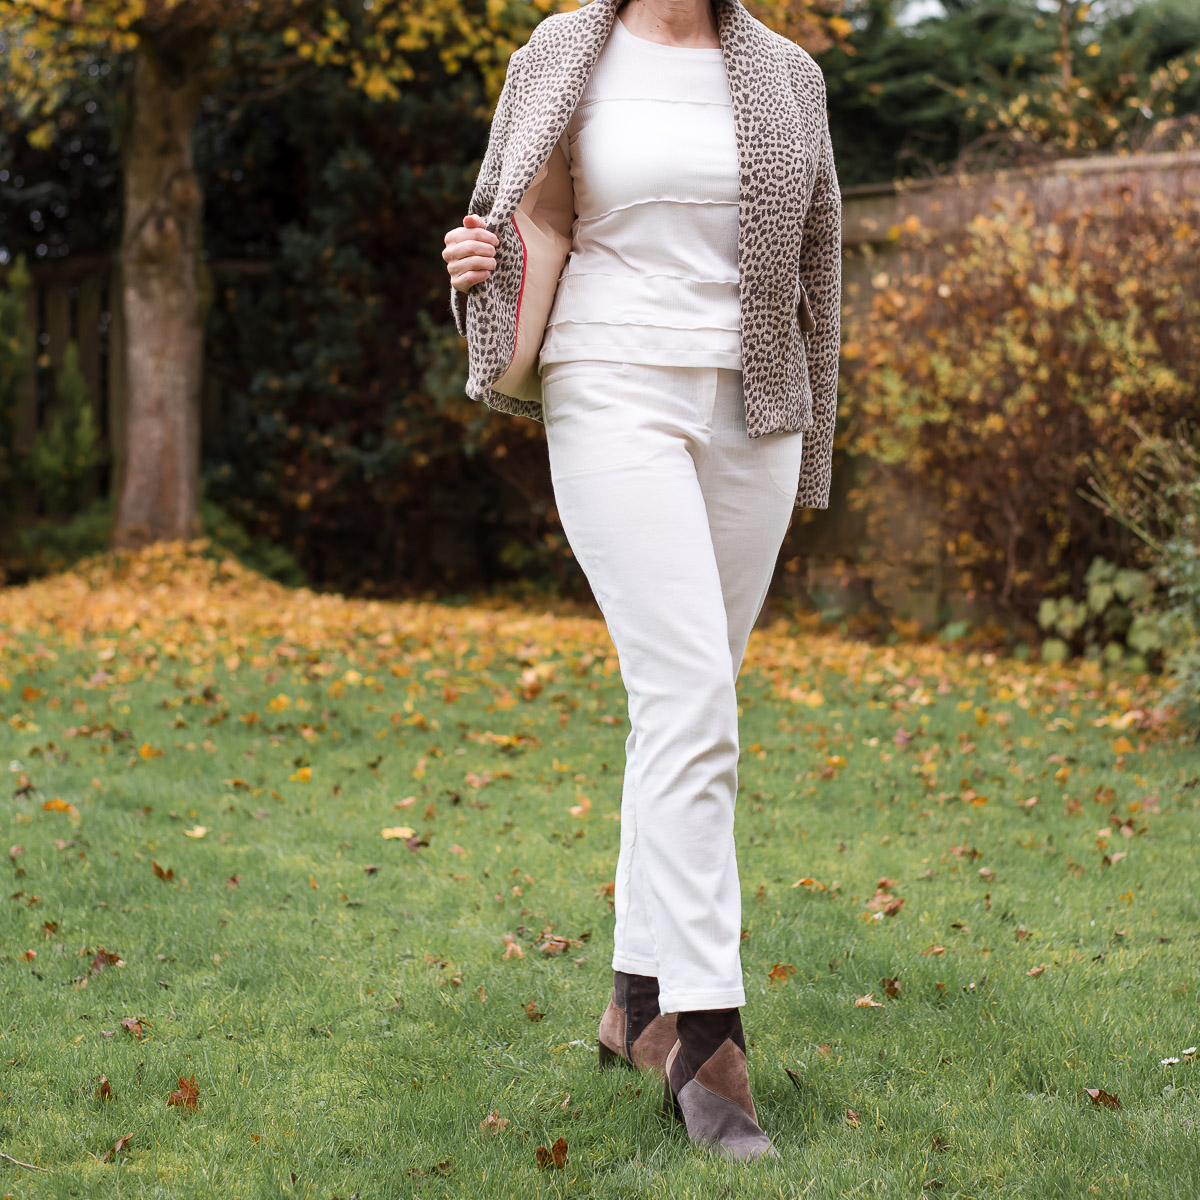
I used printed wool from Fabric Godmother which was a present last Christmas and I’ve lined it with some beige stash-lining that’s backed with a lightweight thermal wadding for extra cosiness.
Pattern Adjustments
I made a toile/muslin first in a size 38 but realised it felt a little too oversized so I went back down to a size 36. The sleeve length was about half an inch too long but elsewhere seemed fine apart from the fact that from side view the front hemline picked up and it was obvious that I needed extra length to accommodate my bust. I didn’t need a standard full bust adjustment that adds a bit of width, I only wanted the length so just a simple dart was needed…except not at the side where it could interfere with the look of those fab pockets. Here’s how:
- First, I created the dart by drawing a slanted line from below the armhole towards the bust point which carried on horizontally to the front edge I cut and spread this by 1.5”
- I drew in a side dart.
- Next, I slashed down from the shoulder to within a couple of millimetres from the dart end.
- I closed the side dart which then opened up the vertical slash.
- Then, I taped tissue behind the slash, drew the dart and finally I trued its upper edge.

Slash and spread then mark the dart. 
Cut down from shoulder to dart point.

Close the side dart to open up the shoulder dart. 
True-up the top edge of the new dart.
The Sewing Bit
So that was pattern prep…next up the sewing.
Actually, before I got stuck into the sewing I completely interfaced each and every piece with lightweight interfacing because the fabrics seemed a bit thinner than I wanted and it needed some oomph. I used a knit, weft insertion iron-on interfacing from Tailor Mouse and once that was completed the first step was the pockets.
Of course, in usual Burda fashion, the pocket instructions needed to be read a few times before I was clear on the process…
First, I fixed the lined flap and the welt in place along two lines, then trimmed and slashed to the corners. The fabric and lining for the pocket bag are seamed across along the previous stitching lines, then stitched down each side and finally, the little end triangles turned under and stitched down.

Grading the pocket flap seams. 
Positioning flap and welt.

Slashing into the corners from the wrong side of the fabric. 
The finished pocket bag.
To be honest, I found the method a bit clunky and feel it could be done slightly differently but I love the result nonetheless.
Constructing the little belts, side seams, shoulder seams and undercollar, all went without a hitch. Then I sewed on the front facings followed by the hems which I caught in place by hand after ironing strips of bias-cut interfacing within the hem allowances.
Here are a few process shots:

I cut open the darts to reduce bulk. 
Some tape was added to the shoulder seam as it was a bit stretchy.

Iron on tape at the roll line and bias strip on the hem allowance 
With the undercollar in place and sleeves sewn in.
Fancy Innards
Next up…the lining…
Using the thin Thermore Ultra Thin Batting mentioned earlier, I quilted it onto the lining by sewing vertical lines about 3 to 4 inches apart using my walking foot and a quilt guide. A quick tip: Where the front shoulder dart is sewn, trim the wadding away from the dart intake to reduce bulk.

For extra pretty insides, I made a flat binding insert detail down the edge of the front facings in a bold red for a pop of colour. There’s a tutorial for this here if you’re interested.
And finally, I created a fancy label detail with a square of fabric that has fringed edges.
You’ll notice that for someone that loves to topstitch there’s a distinct lack of it on my coat. I felt that it may get lost in the busy pattern, yet now I’m having vague feelings of something missing and I’m starting to wonder if I should? What say you? No leave well alone or yes, go for it…tell me in comments.


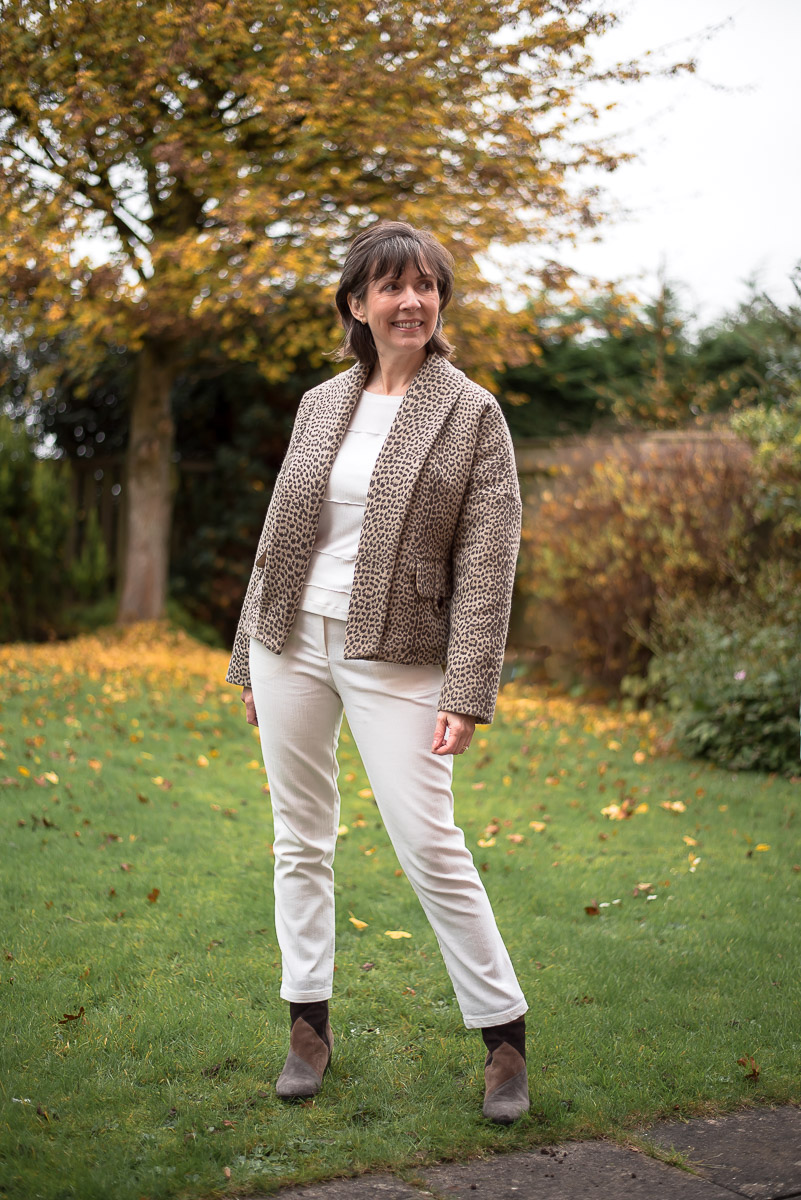

And that’s it…I can’t tell you how much I love this little coat it’s a throw-on-and-feel- fab kind of coat that’s casual and a little bit fancy at the same time. Plus it’s really cosy and warm and it has room for thick knits with those deep armholes. I think I’ll be getting a lot of wear out of it over the next few months. I can highly recommend this pattern…well apart from how tricky the pocket instructions were, hehe. But how about creating a patch pocket under the flap and tab instead of the hidden style as an alternative? Much easier!
I nearly forgot to say that I’m entering this coat into the link-up party held by Stefanie of Sea Of Teal for the November sew your wardrobe basics for which the theme was wool. Thanks for hosting Stefanie!
Okey, dokey, that’s it for this week. Back next week. Not sure if I have a make to share or something else, so it’ll be a surprise 🙂
See you soon.

Pin For Later


I like it without topstitching! It has that pluffy feel and ts would change the feel. Love it!
Author
Thanks, Cynthia! Yes, I think that’s how I feel about it too. It would change the whole vibe I think. Ooh, now I’m starting to wonder how it might look as an unlined Spring jacket in denim…with lots of topstitching! 🙂
It’s fabulous, Diane! Super sewing skills!
Author
Ohhh, thanks ever so much Wis!
Absolutly gorgeous! The jacket looks great on you. Thank you for showing and explaining the details.
Author
Ohhh, thank you so much!
Very interesting pocket flaps with tabs! That’s a detail new to me but will be added to my “interesting details” folder. The photos detailing your process are very helpful . Thanks for posting. Oh….and although I, too, love topstitching I would leave your coat as is!
Author
Thanks, Fran! I know, fab pockets arent they? Glad the photos are all helpful. And I think I will be leaving my coat as it is and go with my initial gut feeling of no topstitching.
What a beautiful jacket! Your photos are always so helpful, and I especially appreciate the lesson on moving a dart to the shoulder. Your garments and your blog are top notch!
Author
Aww, thanks for your lovely comment, Kathy!
Your jacket is lovely as is. With this fabric I don’t think top stitching would enhance the design, but rather distract.
Wonderful job!
Author
Thank you, Elizabeth! You’re right, It probably would be distracting to topstitch it. I will leave it alone 🙂
Save the top stitching for the Spring denim jacket! It looks wonderful and thank you for the instructions, very helpful.
Author
Aww, thank you, Annalise! I will for sure…can’t get the idea of that denim out of my head now!
Wonderful post, Diane: LOVE your new jacket and all of your detailed info. I really enjoy learning about your thinking and process!
Questions:
When you added the dart and rotated it to the shoulder, gaining length top to bottom (something I ALWAYS need!), it looks like from later photos that you incorporated one of the shoulder darts into the rotated bust dart?
Could you have underlined the jacket with the wadding instead of quilting it to the lining?
Thought process there?
What might be the difference in the feel or look of your coat?
Hope my questions aren’t too tedious!
Author
Thanks, Joan! Ah, I think I see the confusion with the darts…there is already a rather small (in width) dart that runs down from the shoulder very close to the neck edge of the pattern (totally hidden by the collar). My own second dart is further over and is only partly hidden by the collar. On the Burda pattern piece itself, there are some confusing extra lines also because there’s one relating to where you cut the front lining. I thought about combining them but it seemed to throw my own extra dart at a funny angle when I tried to draw my slash lines.
Regarding underlining the jacket. As I mentioned it’s already completely block fused with interfacing but I didn’t underline with the wadding as I felt it worked better and was easier to handle on the lining. I’m also not a huge fan of adding stuff like flannel, fleece etc. as underlinings as I feel they can make the finished garment look a little..lumpy?…for want of a better word. Especially if not done perfectly to avoid any pulling from the underlayers being tight. Just my preference really 🙂
Fabulous post and fabulous jacket. Your instructions/techniques and photos are top notch. Thanks as always.
Author
Thank you, Chris! Always lovely to hear from you 🙂
This jacket turned out stunning! Thank you so much for the detail in sewing. I’m a novice at Burda Patterns. I grew up sewing in the 70’s and 80’s, so the big four patterns. Burda’s have challenged me with their layout in magazine.
Author
Thank you, Jodie! Like yourself, I grew up with the big 4 patterns and it’s only been 3 or 4 years since I got into Burda. I’m not hugely fond of tracing from the magazines but I will do it (through gritted teeth lo!). You can get the pdfs of course, as I did for this jacket. They’re reasonably priced at about $5 which works out less than £4 for me.
Oooo, this is fabulous! Love the pockets and the belt detail.
Author
Thank you, Lynne!The belt details was what caught my eye when I first saw the pattern 🙂