
Some of you might be familiar with the brand Brindille and Twig who specialise in childrenswear PDF patterns (with a 14-year-old son who towers over me, I wasn’t familiar with the brand as I’m long past needing to buy kiddies wear, hehe) Well, not too long ago they started a branch of B&T called Street Style Patterns that comprises easy going casual clothes for women and a few weeks ago I was approached by Brindille Twig to ask if I would like to try out their latest release of a new bomber jacket pattern and to tell you all about it. I already have one bomber jacket in my wardrobe (seen briefly in this post) and was definitely in the market for another short casual jacket to wear with jeans and wide-leg pants or culottes so I happily said yes.
***Full disclosure: I was given the pattern and necessary haberdashery needed to complete the project, therefore this is a sponsored post***. I already had the light grey fabric in my stash for this jacket.

Bomber jacket from Street Style patterns: About the pattern
So firstly, a quick word about this intermediate skill level pdf pattern. You have the options for A4 or A0 printing as well as the option to deselect layers of sizes so you can just print the size you need or just two sizes so that you can grade between them. The size range goes from XS to XXL going from bust 33.5” to 43” and there are is also a handy’ Finished Measurements’ chart too.
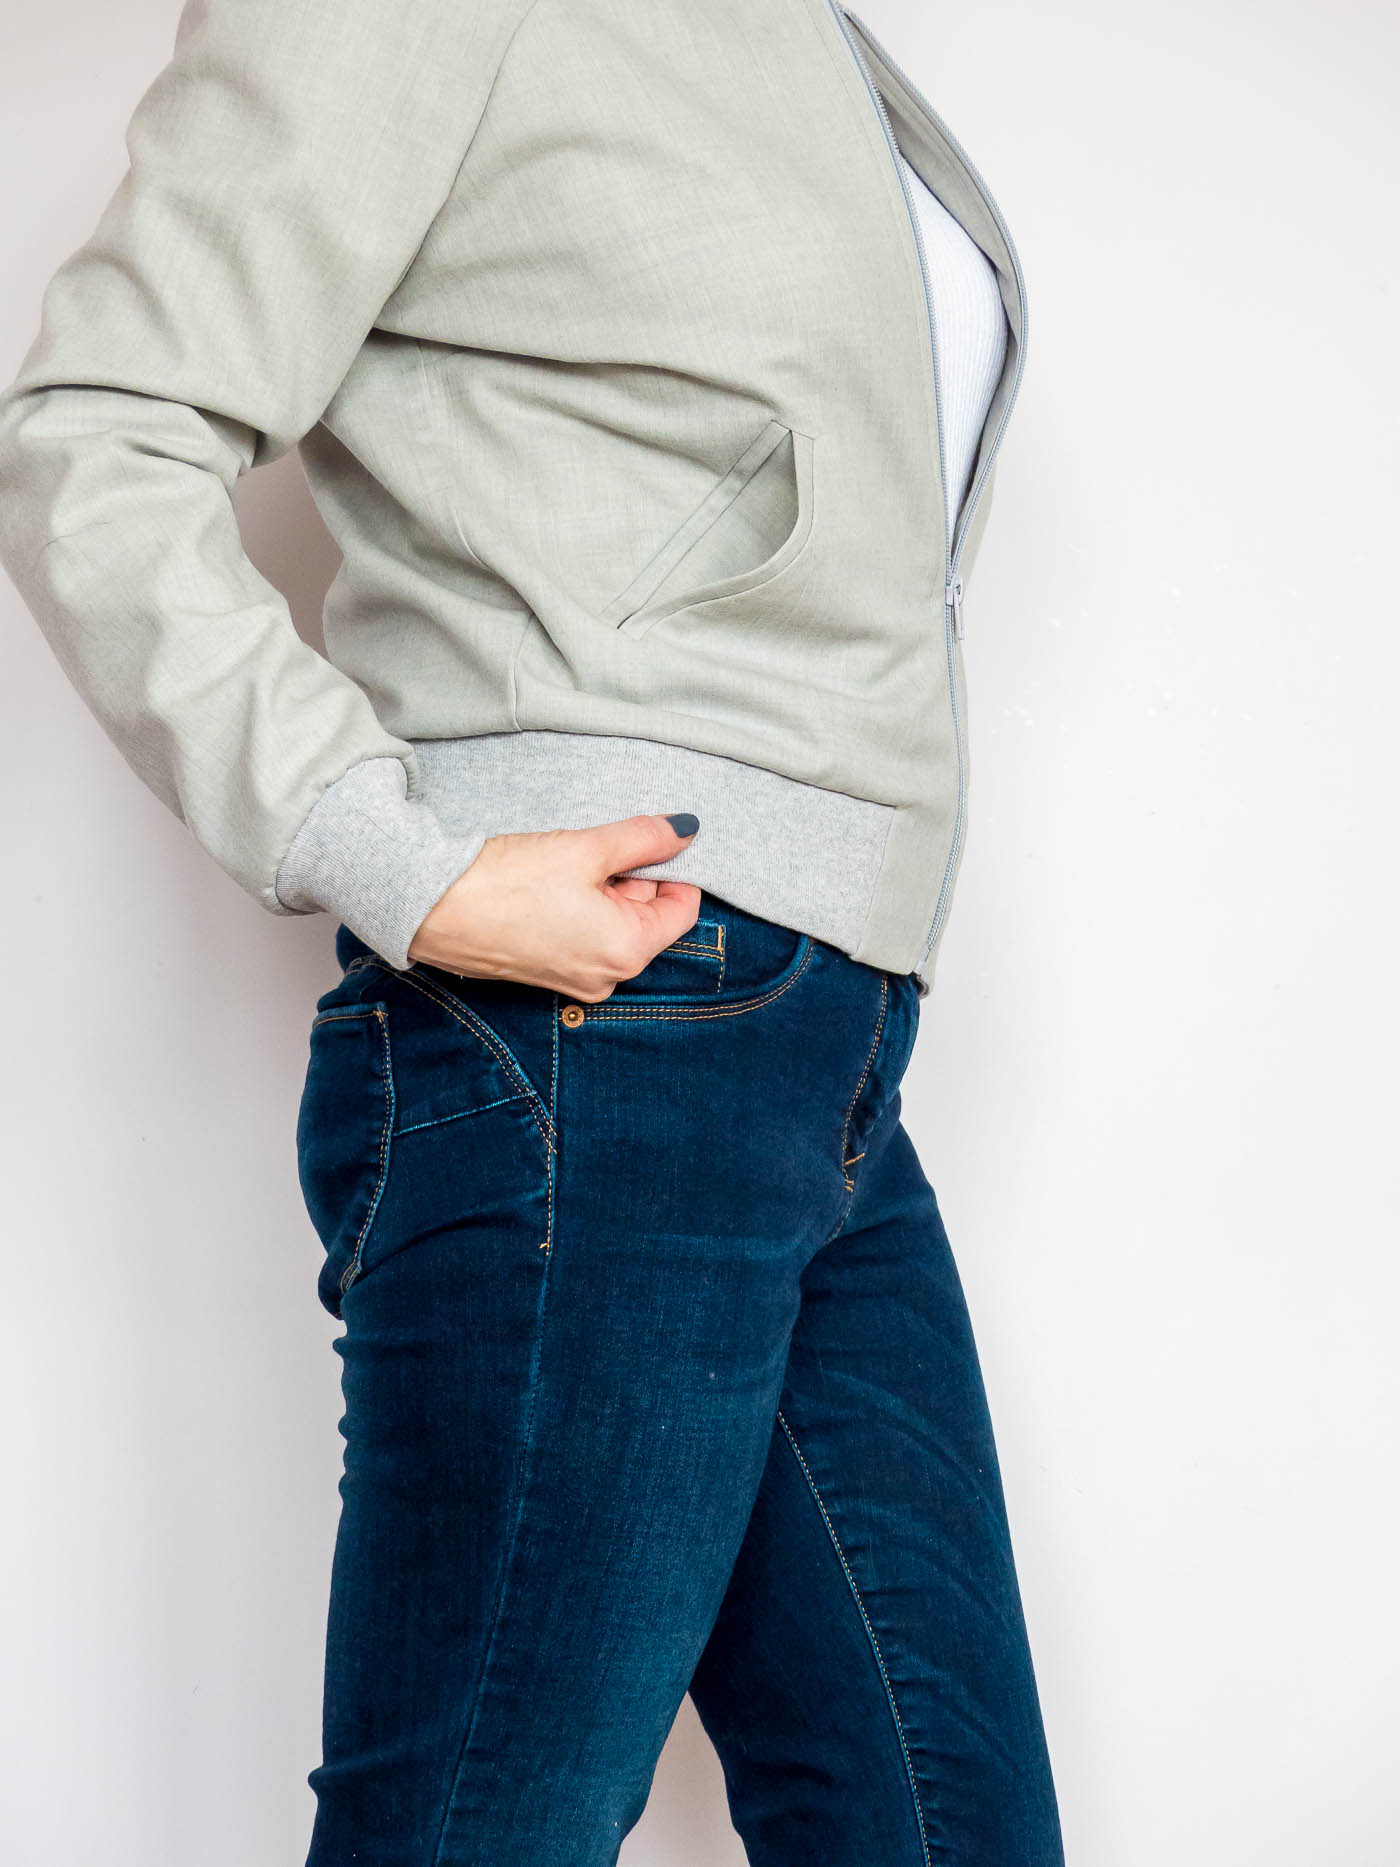
The jacket is unlined and has 11 pattern pieces in all which include all of the ribbing sections, facing, pocket bags and pocket welts. It’s a raglan style with a relaxed fit and finishes at high hip level.
The instructions for sewing up the jacket have a lot of photographs and are really well set out and clear. There is also a Youtube video that you can watch to help with the pocket welts.
The fabric
My light stone-grey fabric came from Ditto Fabrics nearly two years ago. I’m unsure of the exact blend but I do know that it’s wool and a smidge of lycra and maybe a tiny bit of polyester and it’s possibly some kind of suiting fabric. I prewashed it without any problems. My ribbing came from Neotrims and is a cotton blend with lycra. When it arrived I was disappointed by the fact that it wasn’t a great match with my fabric…too dark, unfortunately. A bowl of diluted bleach came to the rescue though and after two long soaks, the colour was faded to a pretty good match, result!

Pockets
I cut my jacket on a size S and there are ¼” seam allowances included. I’m assuming this narrow allowance is because you could sew the jacket entirely on an overlocker threaded up with 4 threads. I would suggest a fairly wide cutting width to get the correct allowance. The first stage of sewing up is to make the double welted pockets. They aren’t as scary as you think to sew. There are detailed photos of each step and as I mentioned before there’s also a Youtube video. The trick is to mark out the pocket lines very accurately and make sure to cut the welt bands accurately too so that the welt pieces stay an even width. Also don’t be afraid to slash well into the corners and try adding a small dab of Fray Check into the corners to prevent unravelling.
Sleeves
Now, the jacket has raglan sleeves and my square, fairly broad, forward rolling shoulders don’t often get on very well with raglan styles. I personally prefer a centre seam going down the full length of a raglan sleeve and these were one piece. I think if you made this pattern in a knit fabric like a velvet jersey or thick ponte then you would probably be fine, but I was using a woven with minimal stretch so my solution was to adapt the top part of the raglan and make a shoulder dart down the centre. I intend to write a blog post about the fit adjustment I do for my type of shoulder shape so I’ll try to do that in the next two weeks and I’ll include how I changed this pattern, as well as how I alter standard set-in sleeves/shoulders… so stay tuned 🙂


Going off-piste
Ok, so you knew this was coming, didn’t you? I simply can’t make a pattern without adding something unique and a bit creative. This was no exception…I can’t help myself!
I think I’d seen something somewhere on my usual Pinterest browsing and it must have stuck in my subconscious. Anyway, I decided to add a shaped yoke that was simply applied to the upper back. It’s basically a ‘v’ shaped piece of fabric laid on top and decorated with lines of topstitching. The next sequence of photos shows the shape of the extra pattern piece that I made and as you can see I folded in the edges and created a neat corner by trimming off the excess at the point and folding both sides in.

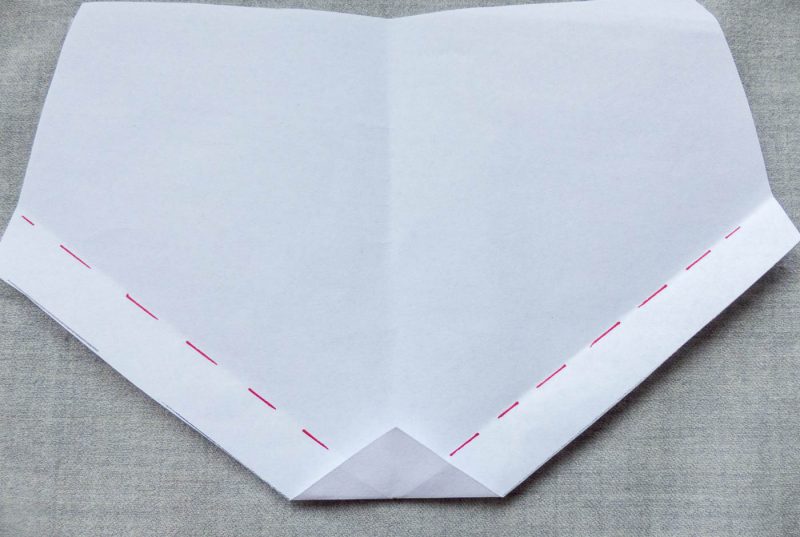


- Lay this piece of fabric in position and baste it in place along the edges. Topstitch along the edge, pivoting at the corner.
- Next, I marked the vertical centre line with some basting. This is to give you an accurate pivot point for each row of stitching.
- I then marked evenly spaced lines using a ruler and either chalk or Frixion pen or whatever marking tool you prefer. Stitch along each line very carefully pivoting at the centre for a perfect corner. I used a slightly darker thread so that my lines show up. You could even use a complete contrast shade of thread if you wish.
I think it looks quite effective and adds a fun touch.

Assembling the body and sleeves
After I inserted the zip and facings into the fronts the rest of the jacket goes together fairly easily by first stitching the raglan seams and then the side seams and underarms all in one go.
The final stage is to add the knit ribbing cuffs welt and collar. As long as you stretch evenly and pin well it’s not too tricky and once again there are detailed photos of each step.

I’m really happy with my new casual bomber jacket from Street Style Patterns. You know, I think when I first bought this grey fabric I think I was intending to sew some kind of blazer, but I know I’ll get so much more wear out of this style jacket because I love how I can dress it up or down. For a more casual look I can wear pale wash boyfriend jeans and sneakers or for a dressier look, I could wear wide leg trousers or culottes with it. Versatile eh?
Thanks so much for stopping by and reading. I had fun making this pattern and thanks to Brindille and Twig for the collaboration. See you soon! x
Pin this for later!


I’ve been looking forward to reading your review after seeing your Instagram posts. I love it! Your attention to detail, especially with the added yoke, is fabulous. I really need one of these in my life – the hardest choice is going to be which fabric to buy for it!
Author
Ohhh, thanks for stopping by Jo, I really appreciate it xx. Thanks for the lovely words. Ooh yes….fabric choices….decisions, decisions 🙂
This is beautiful. It’s a classic piece with a personalized touch. That yoke looks amazing!
Author
Thanks so much Tammy! So glad you like it x,
Great information with a personal touch! You never disappoint!
Author
Oh, bless you, thanks so much Lynne!
I too love your jacket! Its versatility that really makes it a handy jacket to have at the ready. I think it was your choice of gray and the insert in the back that sets it apart from most I’ve seen. I never would have thought of a yoke in a raglan and it looks so intriguing!
Author
Thank you so much Kathleen! It really means a lot to me to hear yours and other’s comments about these extra unique touches that I like to do. I’ve been really nailing down what I want to pass on to others with my makes and my blogging, and it’s to encourage the uniqueness in us all and to encourage my readers to try new things and to experiment.
It looks great. I’m impressed by your ribbing solution. I haven’t used that company but feel it’s coming! I’ve already commented on your fab rear view!
Author
Thanks Anne! Hehe, yes, a bit of diluted bleach worked wonders. I’m guessing it was only effective due to the cotton co=ntent in it as Polyester probably wouldn’t have changed colour.
This looks so amazing Diane, and doesn’t it go well with your boots! I’ve heard of B&T but didn’t know they were doing ladies patterns. I will check them out. Love your personalisation on the back 😍
Author
Thanks Maxine! Yes the jacket and boots were meant for each other 😊
Diane you did an absolutely marvelous job with this jacket and it is just the perfect color too!
Author
Thank you for your lovely comment Faye, I’m so glad you like my jacket.
It’s a perfect jacket! I love the top stitch and details. You did a great job again. Well done;)
Author
You’re so kind, thank you Eli xx
Fabulous jacket, Diane! I adore the topstitching in the back, it’sa real eye-catcher!
xB
Author
Thanks for stopping by Bianca and for your lovely comment xx
Diane, its gorgeous, a real classic. I love the yoke it really does raise it above a shop bought. Also loved it with your boots, great choice.
Author
Thank you Maggie! I love to add a unique touch as I love knowing that nobody else has one the same 🙂
Nicely done! It looks so crisp… if that’s possible! I love adding my own touch to fabrics and patterns. You did the yoke perfectly!
Author
Thank you Linda! I love to see your unique touches too!
Wow Diane! Such a nice jacket. So very you! I’m really impressed by the bleaching of the ribbing. It came out perfectly!
Author
Thanks so much Wis. I’m so pleased you like it. x
I enjoyed seeing the leadup to the jacket on IG. That yoke is inspired! I like the way it highlights the back raglan seams. Your solution of bleaching the knit sections was clever. I must remember that!
Author
Thanks so much Sue and I’m glad you enjoyed the teaser posts on IG. xx
I LOVE what you’ve done with the back, and I love B&T patterns to bits for my little boy, so I am super pleased to learn that they have this street style range! Off to look at it now. As always, what you’ve made looks great on you 🙂
Author
Hi Kate, lovely to see you in my little corner of the internet. Thanks for your lovely comment xx. How cool that you already know and love B&T as well :).
I have seen so many bomber style jackets in so many different colours and fabrics. Yours is jut perfect Diane. You know i like your colour choices. Your attention to the details never seize to amaze me…
Author
Thank you, Ersan! You’re always generous with your kind comments 🙂
Great post, Diane — love this bomber on you! The yoke adds that ‘je ne sais quoi’ element!
Re. changing the color of your ribbing: have you ever tried hydrogen peroxide (hoping the name is the same in British English)? Asking bc I think it could work and would degrade the fiber less, potentially.
Author
Thank you, Joan! Well, I only know of hydrogen peroxide being used when mixing hair dyes. I’m guessing that it removes colour also, so would be great in a dilute solution for fabrics too. Thanks for the tip…always welcome!