
This week I want to talk about adapting sleeve patterns for square or forward rolling shoulders … it’s a bit of a follow on from my bomber jacket post of a couple of weeks back when you may remember that I altered the raglan sleeve a little and I promised that I’d write about how I did that alteration. If you’re interested in fit issues or if you have square shoulders like me then hopefully you’ll find this post useful.
First a bit more about my shoulder shape. So my shoulders fairly broad and square. I have rather pronounced little knobs on them because by the upsweep angle of my collar bones and as a result, my armscye is high and my shoulders quite square. My shoulders also roll to the front quite a bit. Over the years I come to know just what alterations I need to do to a pattern, almost without measuring. I can just spot what needs to be done straight away and I know what pattern shapes suit me best.
I always know that raglan sleeves can often be a bit of a problem for me. The ones with a centre seam all the way to the cuff are fairly easy to adjust but a one-piece raglan style never really works unless I put in a shoulder dart. So without further ado, let’s get cracking…
Adapting a raglan sleeve pattern for square shoulders
This is my method for adapting a one-piece sleeve pattern:
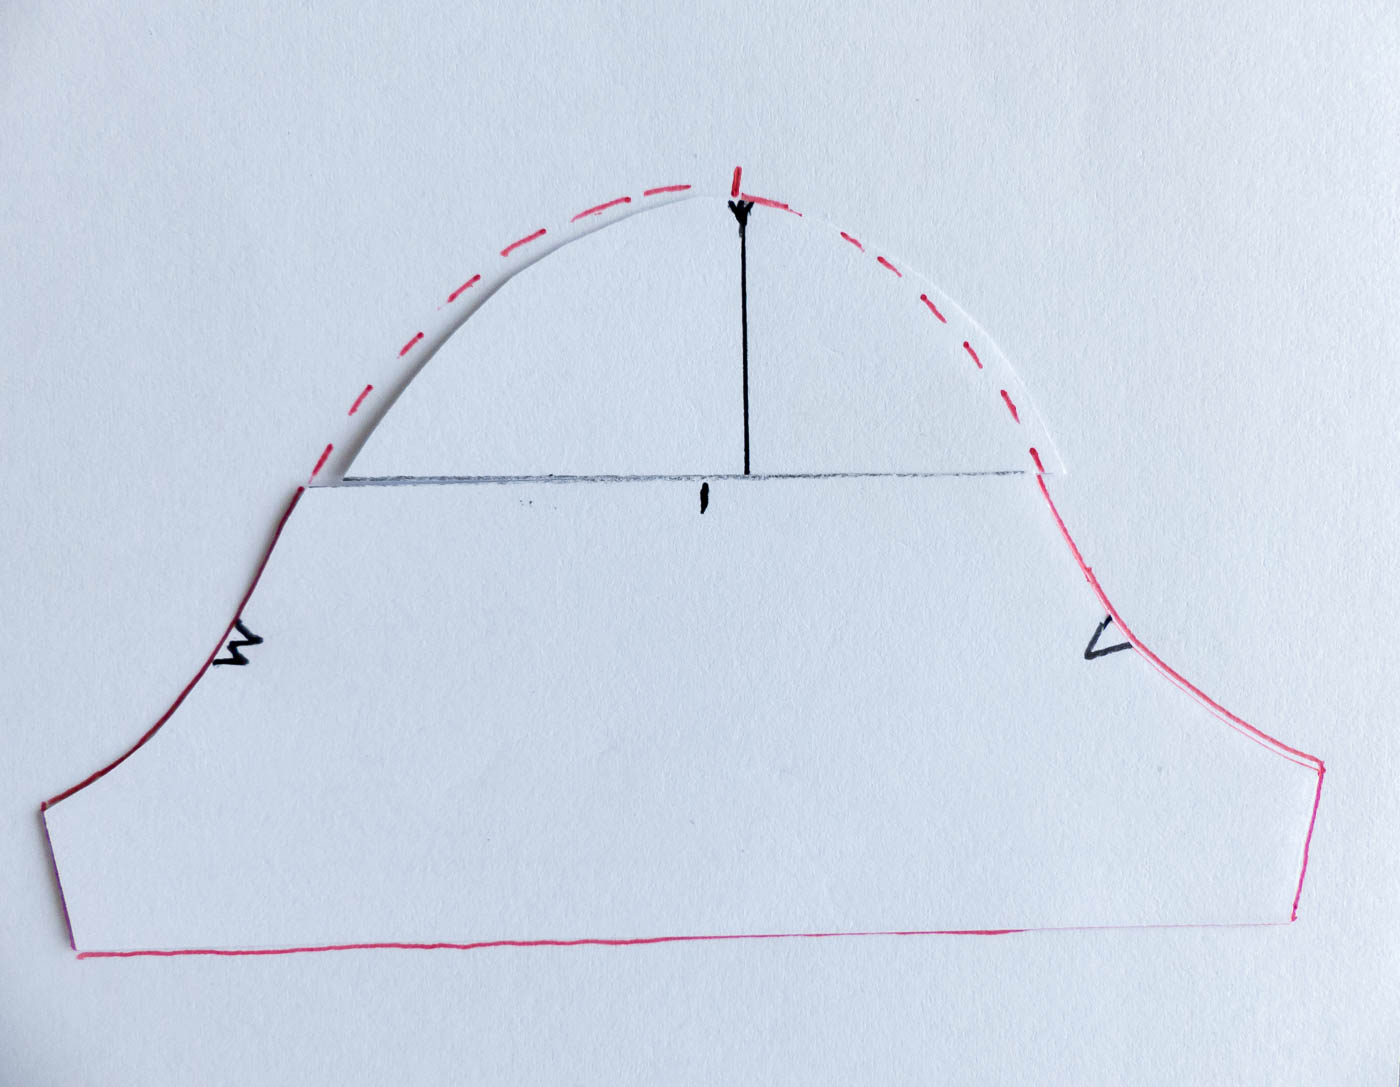
- Draw a vertical line down the pattern piece from the shoulder point for about 3-4”.
- Next, draw a horizontal line across at the bottom of this vertical line. The intersection is the position of the outer curve of your shoulder.
- Cut down the vertical line, stopping at the horizontal one.
- Cut across the horizontal line stopping just short of the edges to keep the sections attached.
- Open out the two top sections until you have a gap at the intersection of about 1” to 1.25”. The more pronounced the squareness of your shoulders…the more you will need to spread the pattern out…so you may need to experiment.
- Place your spread pattern piece on another sheet of paper and draw around it. Use a french curve to even out the sides and at the top create a softly rounded dart shape like the one I’ve shown in the photo.
- Measure each side of the dart leg and true up the line at the top to ensure the ends meet properly when the dart is sewn up.
- You should probably do as I did and make a test muslin first of the sleeve to check the dart length and curve as you may need to tweak the shape of it depending on your shoulder shape. It doesn’t matter if the dart curves a little over the end of your shoulder. Better to have it like that than a pointy dart end.
Note: If like me your shoulders roll a bit forward too, then you will need to position your dart slightly more towards the front of the original vertical shoulder line


Now if you use a two-piece raglan pattern its a simple adjustment of just adding a little more curve at the shoulder on the centre seam and if your shoulders roll forward as well, shave a bit off the front pattern piece and add the same amount onto the back piece. I came across this tutorial that’s in relation to the Clare Coat by Closet Case Patterns, which you might find useful
Adapting a set-in sleeve for square and/or forward rolling shoulders
So, onto set in sleeves now:
Firstly, it’s quite a straightforward adjustment for square shoulders: just straighten off both back and front shoulder seams a little and slightly increase the height of your sleeve head.
If your shoulders roll to the front though, then you need to assess where the new shoulder line needs to be situated. ie. by how much you need to move the seam to the front. This means adding extra fabric to the back at the shoulder line and shaving some off the front. Some tutorials show the same amount added all the way along the shoulder line right through to the neck edge, but for my shoulders, I taper the new line to nothing at the neck edge. You may need to try out both ways…it all depends on how your back neck sits in relation to your shoulders.
This photo explains the method:

This new seam position measurement is then used in the following 5 step sleeve head adjustment for forward-rolling shoulders:
- Draw a line across the sleeve head above the notch marks about 3 inches from the top. This amount isn’t all that critical.
- Draw a vertical line from the centre of the sleeve head to meet the horizontal line.
- Cut across the horizontal line.
- Move the sleeve head to the front by the amount you needed to move your shoulder line as mentioned above.
- Now use a french curve to even up the sleeve head shape blending in at the front and out at the back. You now have a properly adjusted sleeve head to fit the new shoulder seam position.


I really hope you found this tutorial useful and that it will help you with shoulder fitting. It’s good to get familiar with what alterations you need to do for your individual shape and pattern adaptations will become automatic with each new make.
In closing though, I’m in full-on Spring mode because this weekend in my neck of the woods in the UK, we finally have the sun after a week of drizzly dull weather…I’m suddenly thinking of warm weather clothes and to kick things off I’m joining in a two-week challenge being run by my friend Faye of Faye’s Sewing Adventures. The challenge is called ‘Tops That Pop’ and you can read all about the challenge here the idea is to make a top….any top 🙂 I personally like having lots of top options in my wardrobe, so I’m attempting to make two…One fabric has already been pre-washed and the other is ready to go…I’ll hopefully share my makes with you very soon. Till then, happy sewing…and don’t forget to leave a comment if you want to chat about shoulder fit…or tops. I’d love to hear from you x
PIN FOR LATER:


This is perfect for me! Thanks so much for sharing your knowledge and experience.
Author
Thank you so much, Kathy! You’re very welcome.
Thank you Diane! That tutorial re the raglan was super helpful to me – I don’t have square shoulders but mine certainly roll to the front and I always have to do an fsa. I love raglans the best however I was stumped about how to do an fsa on them. You might want to see Louise Cutting’s youtube video on a really easy method for adjusting the sleeve for an fsa – I use this all the time 🙂 https://www.youtube.com/watch?v=Vs2n9l_MFQk
Author
Glad you found my raglan method handy and thanks for that video link, great method!
Intersting.. I have narrow shoulders and follow a similar method for adjusting, also learned by trial and error. That’s what’s so great about sewing. We can modify a garment until it’s perfect for us!
Author
Thanks Linda. Yes, absolutely, it’s great how we can perfect our own makes isn’t it?
How do I know if I need a fsa? I am 76 years old. I have read that one sign is that you are often tugging at the neckline because it is riding up too high in the front. But my neckline usually falls lower in the front, and I am adjusting (lifting) it to fit higher. I don’t know if that’s the garment stretching over time (I wear mostly knits), or if it reflects my body.
Author
Hi Ev. Hmm, generally, yes…you will feel as though the neckline is pulling back and up, but I wonder if you have a little too much width across your front compared to the back? Try pinning a small wedge of fabric out of your front neckline width first before you assess the fit of your shoulders. Then have a look to see if your shoulder seam looks too far back as well. If anyone has a slight rounding of the upper back it can be accompanied by a slight hollowing of the front neckline area too, so it could be more a factor of how back width balances with front width. Just thinking out loud here….
A very useful post, thank you Diane!
Author
Thank you Sue. I’m so glad you think so x
Thank you for such a detailed explanation of how to do these adjustments. I have no idea if I have a forward rolling shoulder – is there a way to tell? Just look at the shoulder seam of a garment and see if it falls directly in the center of my shoulder?
One alteration I do think I need to do is a swayback alteration, but I actually don’t know if that’s the issue and I don’t know how to do the alteration.. Do you know of any resources to help me with this? Thank you!
Author
Hi Karie. Yes, check on your shoulder seam. But also you may have a feeling of your neckline sliding to the back and wanting to continually tug it forwards. I do know of a sway back alteration too. They work best if you have a centre back seam down a garment. I’ll look around for a good resource for that and I can perhaps message you on IG with it. Any time you want to ask me something feel free to use the contact form on here as well and you can email me 🙂
I love your posting. It is very clear to understand how to adjust the pattern and also so helpful for practical use:)
Author
Thank you. I’m glad you find it useful 🙂
Thank you for sharing this information. So clear and concise. I am really looking forward to trying your technique for raglan sleeves, as your description of your shoulders is a perfect description of mine, including the knobs!
Author
Thank you, Paige! I’m so pleased you found this useful and I hope that it helps you to get a nice fit for your own sleeves. Let me know how you get on and if you need any more help or advice:)
Diane this is a great tutorial have just found it. All my adjustments are up top, forward shoulder, back & bicep & my favourite designs are raglan sleeves. So helpful
Author
Ohhh, I’m so glad you find my post useful. Thanks Lynda!
I am looking for “Adapting a one piece raglan sleeve pattern for forward rolling shoulders”.
This shoulder seam in a raglan drives me crazy – so I more of less gave up sewing raglan long ago.
But now I have a fabrics that calls for raglan but without this seam and the muslin pulls in all directions.
Can you help?
Author
The example in my blog post is strictly speaking a one-piece sleeve. The seam would need to go all the way down to the cuff for it to be a two-piece. The dart in my example though, is only needed for very square shoulders which is what I have. So personally, for myself, I’d always need that short dart. If you have more sloped shoulders then a one -piece in knit without the dart could work.
To be honest, I don’t like myself in raglan styles so the jacket in the photo is the only thing I’ve ever made with raglan sleeve 🙂 .
A couple of suggestions I can think of for you is this: At the top of the raglan sleeve you could bring the front slope seam over towards the front and remove some from the back slope seam. You’ll probably also need to remove some from the sloped armhole seam on the front body pattern and may need to add to the back sloped armhole seam on the back body pattern . This will shift the whole of the upper part of the sleeve forwards while leaving the lower part alone. Worth a try perhaps?