
I’m kicking off a new occasional series today, in which I’ll be exploring sewing techniques of all kinds. A smorgasbord of inspiration for you!
I’ll be highlighting different types of each detail and giving you lots of food for thought (wait…I must be hungry because first I mention smorgasboard and now food…hang on while I grab a snack….)
Now, where was I? Oh yes… and I’ll give you ideas for where and how you could use each one. I hope my posts will help you to get those creative juices flowing and make your projects truly unique. So today I have 10 ideas for using sewing tucks.
Methods of making tucks
Tucks come in all different shapes and sizes and can be used for delicate details or to make a bold statement. There are two main ways to create them
1. Narrow pintucks using a special sewing machine foot:
Some machines come with a pintuck foot, or you can buy one as an optional extra. These special feet have grooves underneath and are used with a double needle. The little grooves under the feet enable the fabric to raise up and create ridges. By tightening your bobbin tension the tucks stand out more. one You can even use cording under your fabric for a more defined tuck effect. Finer weight fabrics will probably raise up more than heavier weights, so bear that in mind when deciding on your project.
Double needles come in different widths and they can be paired with different pintuck feet. Here’s a quick guide for you:
3 groove foot = 4.0 double needle
5 groove foot = 3.0 or 2.5 double needle
7 groove foot = 2.0 double needle
9 groove foot = 1.6 double needle
Here is a useful post from Threads Magazine about making tucks using a grooved foot.
2. Tucks of any width using a regular machine foot:
The second way to make tucks is to make folds in fabric and stitch along in various widths away from the fold for fine or bold tucks. Carefully mark out stitching lines and pin the lines together. Stitch the straight lines and press the tucks flat. There is a good tutorial on Tilly and the Buttons website for this process.
I used a slightly different method in this blog post, whereby I used an iron and pressed fold lines in my fabric and then just used my standard machine foot as a width guide. I also made my tucks first and cut out my pattern shape after. That way I didn’t risk making the tucks a fraction too big causing my fabric pattern piece to end up too small.
10 ideas using sewing tuck details:
Let’s look at some inspiration!
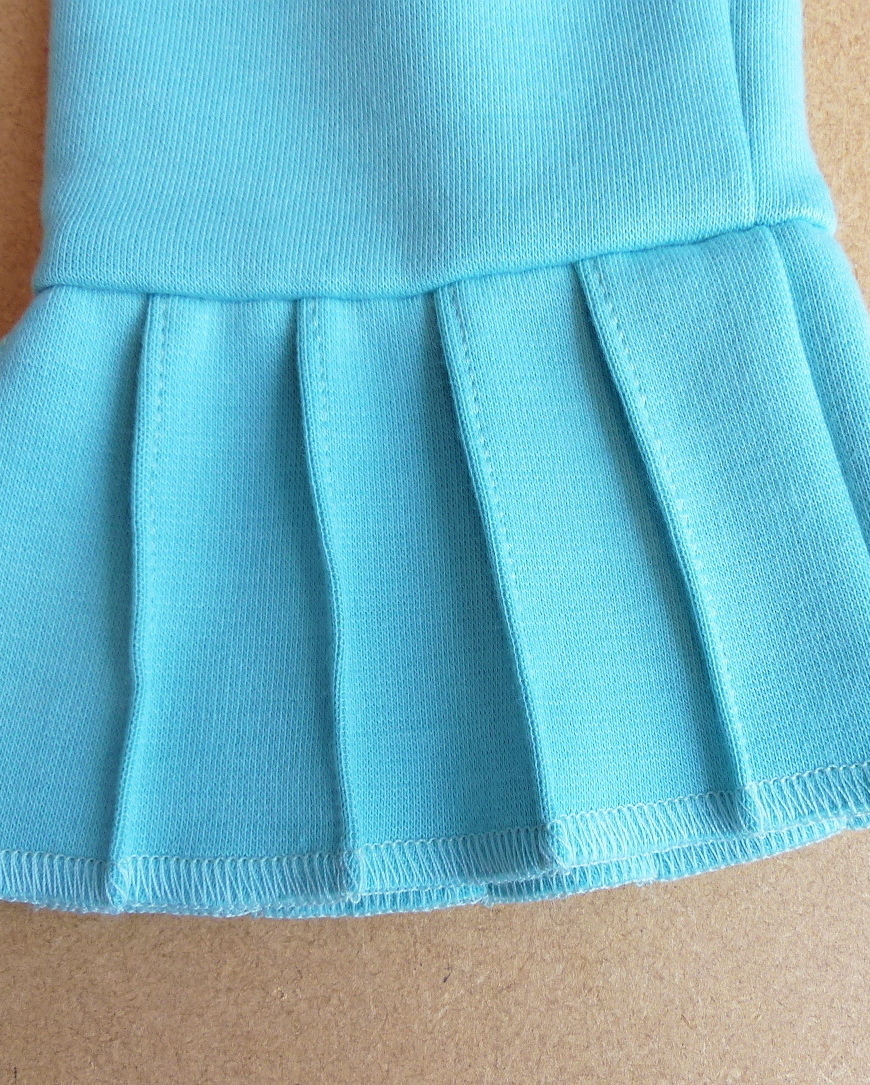
1. To make a pleated effect cuff detail: This is a detail I used on my mint coloured ponte knit dress in this blog post.
2. To create fullness and gathers: The flame-coloured Burberry dress has horizontal tucks that make a ruffle effect on each side. And the navy dress by has vertical tucks down each sleeve that are released below elbow level to create a puffed sleeve. Notice how the skirt has fullness after the tucks finish too. You could reverse this idea and use tucks to reign in fullness…maybe at the bottom of a sleeve to make a sort of cuff.


3. How about making tucks and then stitching across them to make lovely origami wave effects? I came across this image from a book by Ruth Singer called Fabric Manipulation. You could use an effect like this in a small panel down a top or across a sleeve.

4.What about really narrow random tucks for creating visual interest that breaks up an expanse of plain fabric and makes for a truly unique garment. I did this on my coral boxy top. You can see a lovely example here too by Lynn & K Meta Reintsema. The image is from Philadelphia Museum of Art Craft Show, found on Pinterest :

5. How about adding broad horizontal tucks as a means of shortening a garment? I did this on a RTW trench coat that I decided was too long. I always get compliments about the feature when I wear it.

6. You could create a chevron effect like on this vintage McCalls pattern. Making tucks on the bias would be tricky so I assume the actual skirt and bodice are cut on the bias and then your tucks would be created along the straight grain. Nice idea don’t you think? I would use a fairly stable fabric for this though. Maybe a linen, or mid-weight wool?

7. How about creating an all over fabric using wide horizontal tucks. Great on sheer fabrics to achieve modesty too. (Image source unknown)

8. Use a striped fabric and make a peek-a-boo effect of the colours when stitching them in different directions. Look at this amazing effect by Versace: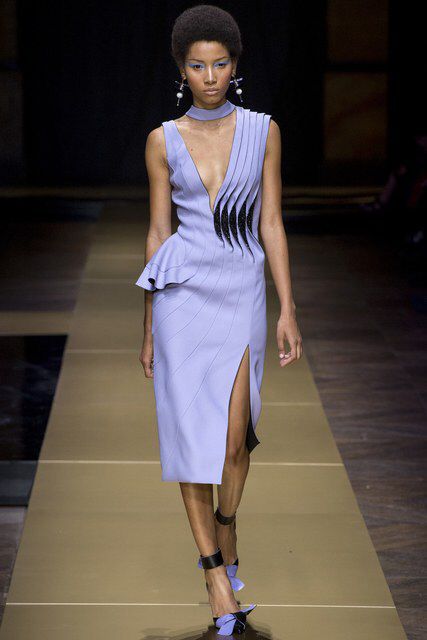
9. Make a lovely angled panel for a fabulous jacket detail like this Vogue pattern (number 1364):

10. To create asymmetry. What about adding several released tucks on just one side only near the hem of a top. I like the drape effect this gives too. (Picture source unknown)

I could probably find lots more inspiration, but I thought 10 ideas was a nice number to go for. I hope you enjoyed the examples and perhaps you feel inspired to try some? My head is often buzzing with ideas when I write posts like this. If only there were more hours in the day!
Have you ever made anything with some sort of tuck detail? Let me know if you have in the comments.
Till next time. Thanks for reading!
PIN FOR LATER:

Good article on pin tucks. Now I want to get back to sewing to try a few out.
Author
Thanks David! I’m pleased to hear that you found it useful.
Great inspiration post Diane! I need to try adding pintucks to my garments. Thank you!! 🙂
Author
Ah, thanks Lisa. I’m happy you feel inspired!
Thanks for the great ideas! Really like the origami effect!
Author
Thanks so much, Wendy. Yes, that origami effect looks great. I fancy trying that one too.
Terrific post Diane. I’m just doing a tutorial on rubbing off and will link to this post as ideas to add design features. Some of these would really lift a garment to new levels. Got me thinking…
Author
Brilliant, thank Sue. I love inspiring my sewing pals. And it’s kind of you to do the link. Look forward to reading your rubbing off post too. xx
I love the tops in photos 4 and 7, definitely lots of inspiration and plenty of ‘food’ for thought! X
Author
Great aren’t they? I’m pleased to hear that my post got you thinking Maxine. Thanks xx
Thank you for this brilliant inspiration post! I like pintucks but avoid them normally because I haven’t been thinking about them “outside the box” 🙂 I think of the traditional shirt with pintucks down the front which emphasize the bust (with a FF, not a look I’m ever seeking!) but you’ve shown how they can be used asymmetrically and on sleeves and the back where my bust line wouldn’t present an issue (for me). I love the asymmetric lines especially! I’m bookmarking this post! I”m just in summer sleeveless blouse making at the moment so these ideas I’m definitely going to play around with!
Author
Thank you for such a thoughtful and lovely comment as always Kathleen! I’m really pleased to have got you thinking ‘outside the box’. Some of the ideas I mentioned would definitely be great to use on your Summer tops. Enjoy experimenting.
Lovely post, Diane! Lots of inspiration here!
Author
Glad you enjoyed it Linda. Thanks so much!
Great post Diane. I love lots of the ideas here and they are super for taking our garments up a level. I really want to think about tucks. I used some in my dress for a Spanish challenge I did as a way to use wool which was in the kit, but I really like the effect and shall definitely use more, and refer back to your post. Thank you for sharing inspiration and your knowledge.
Suzy xxxxxx
Author
I really appreciate your lovely comment. Thanks so much, Suzy xx
Great post, I have been thinking of using more embellishment in my clothes.
Author
Thanks, Rosemary. It’ll be fun to experiment.
I cannot find the lilac Versace dress anyway. Can I please ask where you found it?
Author
Hello Laura, I updated my post with a direct link to the collection on Vogue.com. Just click on the word Versace above the photo. 🙂