
A few weeks ago I was asked if I would share the way that I made my thread storage board with you. So better late than never here it is, a guide to how it all comes together with my DIY thread storage method.
I’ve included a couple of photos showing the measurements of my own storage. Mine holds 150 reels and my dowels are long enough to hold overlocker/serger thread cones too. Because of all of those threads, plus the board, it all ends up quite heavy…you’ll note that my board is actually resting on the wood edging on top of my work table which helps to support it.
So firstly gather together your equipment :
1. a decent sized piece of chipboard or MDF(I preferred chipboard as it was easier to drill) Mine is just over 1.5cm thick (5/8″)
2. a long ruler or a set square for marking, plus a pencil
3. electric drill and various bit sizes.
4. wooden dowels (wood is better than balsa because it’s stronger)…I ordered 50 dowels (Ebay) each measuring 30cm and cut each into 3 pieces.
5. screws and wall fixings to attach to the wall.
6. rubber mallet.
The first stage is to mark out where your holes should be drilled. I marked out a grid on my board and left a reasonable border of space around the sides to allow room for the fixings to attach the board to the wall. Where all of your grid lines intersect is where you’ll drill the holes for your dowels. Of the two photos below, the second one shows how far apart the holes were to allow for the width of my threads.

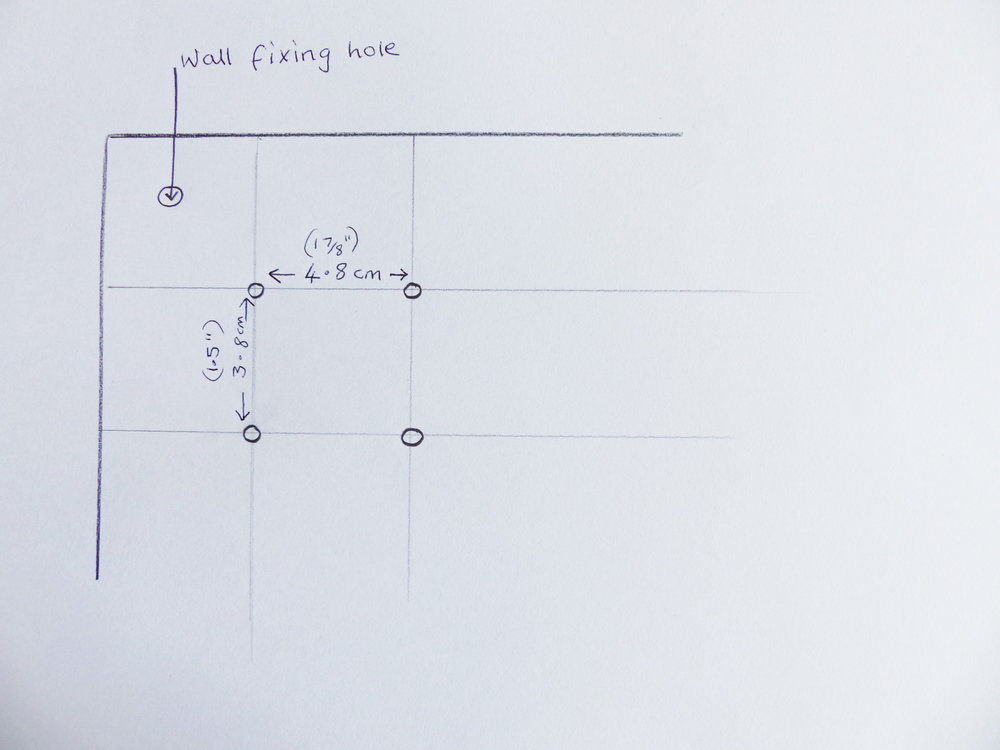
Now, my dowels were 5mm diameter ones, but your final holes on the board should be the tiniest bit smaller than this in diameter so that each dowel is a snug fit. I suggest you practice drilling some holes on a spare piece of wood to find the perfect drill bit size to use.
For the drilling stage, I supported my board on some pieces of wood to raise it off the ground. It’s very difficult (well it was for me) to avoid the possibility of the drill bit going all the way through the board and you don’t want to ruin any flooring underneath!
After I had drilled all of my holes I did a light sanding over any rough edges and then I painted it. Finally, you have the fun bit of knocking in the dowels. I would recommend using a rubber mallet for this so as not to damage the top of each dowel. Afterwards, with the help of someone to mark out your wall you can fix it up….then fill it up and enjoy!
Pin for later!


Very nice, I love that idea! You are so smart. Thank you for the informative post:)
Thanks Eli cat, I’m so pleased you find my post useful 🙂
This is a beautiful jacket and I love the lining. Normally I wouldn’t have been keen on this type of jacket, but you’ve changed my mind. Its not too fussy, its just perfect! In one of your pictures your wearing a Khaki pair of trousers with a zip at the ankle. They are gorgeous too! Can I ask what pattern you used for those as I’ve just ‘found’ you?
Hi Janet, I’m not sure why but your comment has popped up on my thread storage post, but I know the jacket you’re referring to from my previous post and I’m thrilled that you like it. Regarding my trousers, they are actually made from my own basic trouser pattern which I took from a RTW pair. I changed the lower legs to create the zip and tucked hem. Maybe I should do a tutorial post on the method?