
I have a brand new dressform! This one is practically a body-double and today I’m sharing my experience of making a custom dressform by Bootstrap Fashion, with a few extra tips that might help you out if you fancy trying one for yourself.
Before I get going properly though, I just wanted to say what a strange and sometimes stressful few weeks it’s been since I last wrote a blog post. Apart from dealing with the general ‘off’ feeling that we’re all experiencing during this lockdown plus a disappearing Sewjo we had a difficult time with my beloved kitty Bilbo (you may have seen him pop up in an occasional blog post photo or on my IG Stories). He was diagnosed last October with a tumour on his liver and actually surprised us all by responding well to the steroids that he was given…however 3 weeks ago he deteriorated and became very poorly. Several vet visits culminated in facing the fact that it was time for us to say goodbye and so on April 25th as I held him in my arms in our sunny back garden, he slipped into a forever sleep and went across the rainbow bridge. The house feels so different now without my constant buddy being around. He really was one of the family and I miss him tons.

So after that little update, I guess I had better get on with the task in hand and that is to chat about my dressform. As I said it’s by Bootstrap Fashion and I first heard about these custom forms when I saw that a couple of sewers that I follow on Instagram had tried them out and I was impressed at how good they looked.
The idea is that you have to take a whole lot of measurements including adding modifications for tummy protrusion, bottom shape, shoulder line, stance etc. Then when you’re ready you purchase a pdf pattern file which is customised to your figure.
You need other supplies too. These include a length of plumbers pipe for inner support, some thick cardboard, a big bag of polyester fibre stuffing, woven interfacing, a piece of sponge for the neck and a hat stand to mount your finished form on. When you get the PDF including instructions all of the extras that you need are listed. There’s even a video showing the making process on Youtube which I found really helpful.
UPDATE: There is now an updated interface on the Bootstrap Fashion website and the whole measuring and ordering process involves helpful videos, plus you get full instructions with photos to accompany each step once you’ve purchased your pattern.
Now before I go any further, I must tell you that this is in fact my second go at making this dressform…it turns out that my first one was doomed from the start…
It all started with me choosing a fabric that wasn’t such great quality. Then I decided to follow the advice for preshrinking the interfacing (which does work successfully on some interfacings) and ended up losing a lot of the adhesive so it didn’t stick to my fabric as thoroughly as it should have. I got very close to finishing the dressform and realised that as I was putting the final touches to it I must have pricked a finger because there were marks of blood here and there all over it. I tried cold water amongst other things and when I finally decided to try a bit of bleach it was a huge mistake because the marks changed to big blue stains…ugh!!! Added to the fact that there was a wrinkle all down the lower centre seam and the bust wasn’t quite the right shape (maybe because I didn’t stuff properly) I decide to try again but this time with better fabric. I already had all of the other supplies after all. So this is dressform mark II which I’m thrilled with!
So here are the tips that I want to pass on to you, having made this project twice and learned from my mistakes:
- Measure yourself accurately over your bra and panties. Wear the style bra you wear the most under your clothes and you might also like to do what I did and measure your main areas (bust, waist, hips) at 3 different times over 3 days and take the average.
- I ordered the option without seam allowances. This allowed me to draw around each pattern piece so that I had accurate stitching lines to follow. This is very important for getting an accurately sized finished project.
- I did block fuse the interfacing onto the fabric (as advised) as it means you can just mark out all of your shapes on the wrong side which again means a better result.
- Make sure to use a substantial thickness of cardboard for the armhole covers and base insert. I used a sharp Stanley knife for cutting mine.
- I decided to add a very narrow seam tape around the underbust curved seams, it helps to keep a good bust shape when you stuff the finished form and prevents over-stretching of the seam.
- Clip all curved seams thoroughly. It really does help.
- I found the shoulders the hardest part to stuff because you’re up to your armpits trying to get the stuffing in, but take your time as it’s worth getting a good shoulder line.
- Stuff the bust area fairly firmly.
- There is some negative ease built into the pattern so don’t try it on and think it’s way too small. The stuffing process stretches it slightly.
- Make sure to sew with a short stitch length as suggested by the instructions.
- When you insert the cardboard at the end stages you are asked to glue the narrow fabric strips from the pipe tube to the cardboard base. I decided that using velcro sewn onto the strips and also glued to the cardboard, makes life easier should you need to remove the cardboard base.
The shape of the dressform side view is determined mostly by a very strange-looking inner structure which is made from a firm fabric (I used heavyweight calico). This inner piece goes right through the middle of the dressform from front to back and is attached to the centre front and back seams. It also incorporates the fabric tube that you insert the plastic pipe. It’s worth checking how this ‘side view’ shape looks before you attach it because that is in effect your body side view….so think to yourself “does this look like my silhouette from the side?” I looked at mine and decided that the tummy was a little high and the bottom just needed flattening and lowering a smidge.
Anyway, I decided to tweak the shape of the support piece and here is the original shape onto which I’ve drawn lines showing the slight modifications that I made.
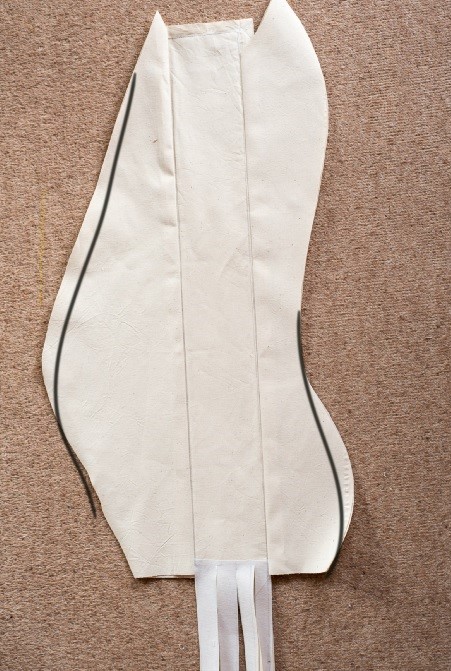
I trimmed off along the lines and this meant that the finished shape of my form around those areas, once stuffed with the polyester filling, was more elliptical and truer to my shape.
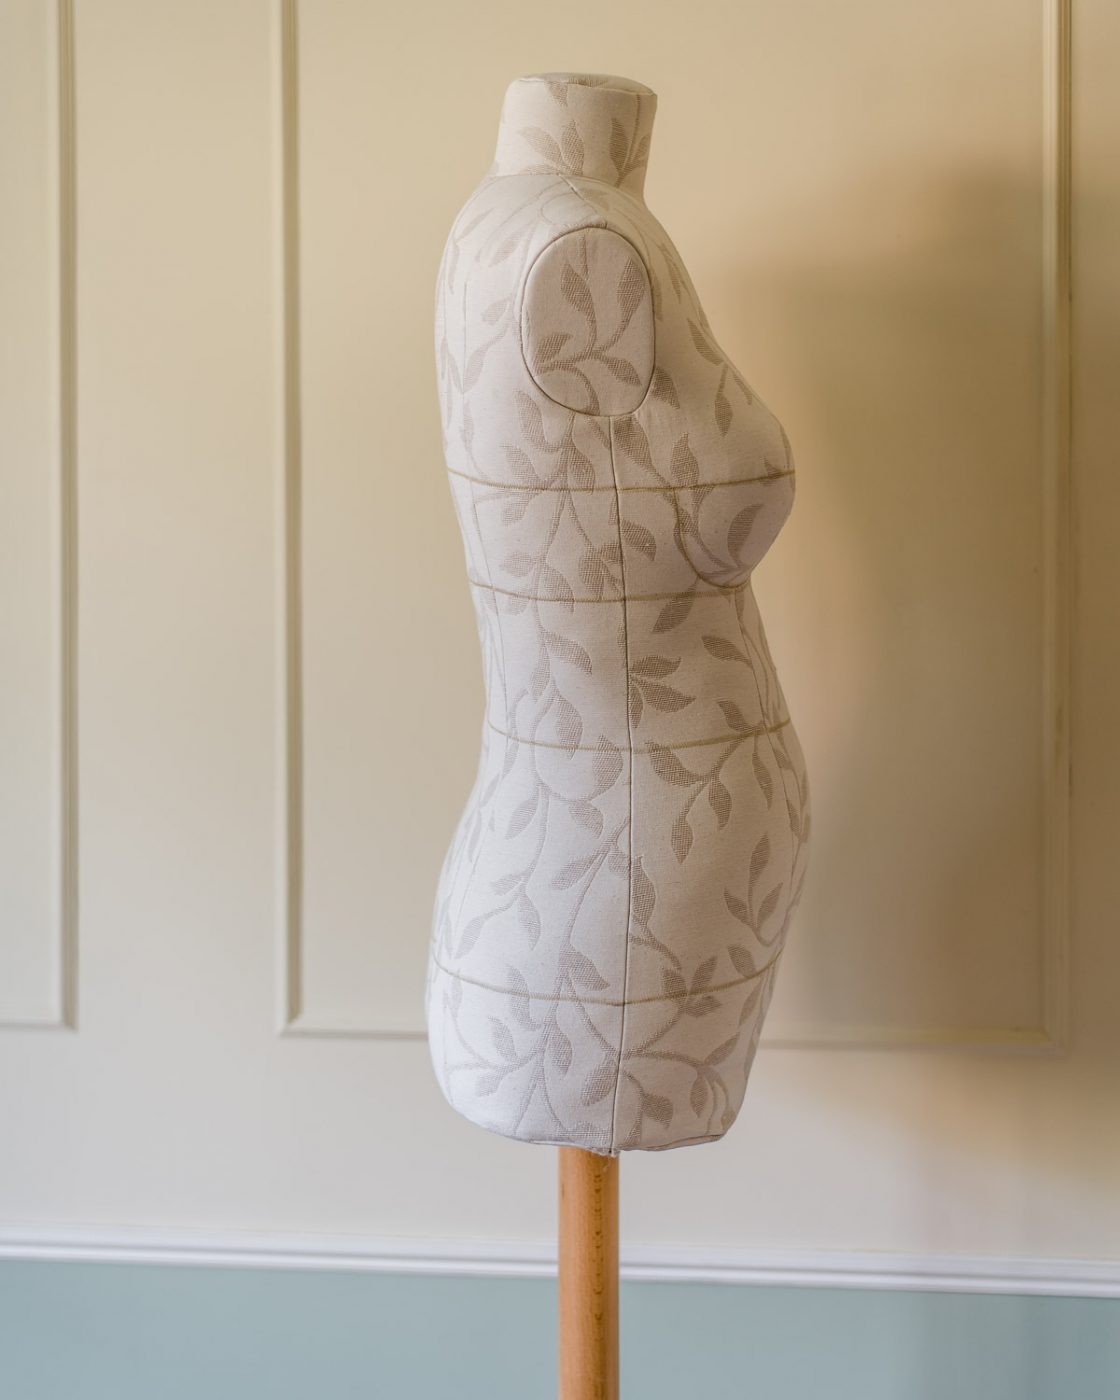


Now that it’s complete, I’m really, really pleased with dressform #2 and I think it’s pretty damn close to my shape. And though I do say so myself I think it looks rather professional too. I much prefer this fabric as well and I think Frida (yes, I named her 🙂 ) and I will spend many a happy hour creating garments together….plus when you factor in the cost of everything you need to make it, including $24 for the PDF, I think it still works out cheaper than a standard ready made dressform.
PS… here are the items I bought to complete my project (some may be affiliate links):
90cm length of push fit waste pipe 50mm diameter
Oh and finally, I nearly forgot to say that you can access the stuffing filling through hand holes in the cardboard base, which you can also remove if you need to, so you can always add or take out some filling in case your weight fluctuates a little. Useful eh?
Thanks for stopping by and having a read. I hope you’re keeping well and trying to stay positive. Let me know in the comments if you feel tempted to try a custom form for yourself.

Pin For Later


This is a great review of the process. I’ve got the pattern but haven’t made it yet. Yours looks great, and the construction details were really helpful.
Author
Thanks, Karey! I’m glad my hints and tips are handy.
I’m so sorry about Bilbo,and it’s such an awful time for that to happen. Your dress form is fabulous, what a difference it will make to fitting. I once had one made from plaster cast material. I had to stand there for hours having bandages wrapped! It was a bit of a shock to see the shape, but also not that accurate being too big, so I never really used it! Might try the bootstrap version though, thankyou.
Author
Ahh, thank you, Maggie.
Oh wow, that plaster cast process sounds quite a challenge, but what a shame about it being too big. I personally think that with this type of fabric form it’s better if its a teeny bit smaller as you can always stuff more firmly.
Di this is so inspiring … my shop bought Dressform is battered … and of course, years down the line, I realise the serious limitations with a standard form – neatly illustrated by your flat butt adjustment (yep, I’d need to make one of those too!) I just need to get my weight to stabilise. But I really can see myself making one for myself – yours does indeed look highly professional – in fact it’s beautiful!
Author
That’s lovely of you to say, Sarah. And that’s exactly my experience with a standard form…they simply don’t have the individual modifications quirks that we have. For me, it’s big waist, flat butt, forward shoulders. I’m sure if you had a go you’d love one. Oh, and by the way, you can access the stuffing from underneath via hand holes in the cardboard base so that you can pull some out if you’ve lost some weight, or add some more. The material base, below the cardboard, has two zips in it.
Well colour me impressed; this is indeed a very professional looking dress form and I look forward to seeing if it helps you with fitting. Your hints are really useful and if I make one for myself I will be sure to reference your post.
Author
Thanks ever so much Sue, much appreciated. Let me know how it goes if you ever try it for yourself.
Wonderful article! Thank you for writing this and it’s very inspirational. My problem areas are big hips; is it possible to address this situation with this dress form? Does it cover the hips? Thanks in advance. I might actually do this.
Author
Thank you, Karen! You can absolutely have any size you want. The fact that you input all of your own measurements before purchasing means that it’s made just for you…whether you’re pear-shaped, big/small busted, flat bottomed, round-shouldered etc.
Put peroxide on the blood stains. Use a q tip or makeup sponge.
Author
Oh, that’s brilliant, thank you!
Diane,
Thanks very much for sharing your Bootstrap dress form process. I didn’t know about this custom form option and am likely in the market for a new one. I have a “My Twin” custom from my early 30’s (now 26 years on!) and it would still be close, if not for my expanding waistline… My Twin was a plaster of Paris wrapping, cut off the body, and filled with foam, then covered with a fine cotton ribbed knit. Still “trying” to lose 3″ from my waist!
I am truly sorry to learn of Bilbo’s passing. I love cats, and can tell Bilbo was important to you, seeing the lovely photo of him in the garden wearing his harness.
Author
Thank you so much, Joan. I’m glad you feel inspired after reading my post :). Thanks also for the kind words about Bilbo xx
p.s. You make it seem fairly straightforward (except that we know this was your second!), but I am pretty certain it is a lot of work to make a form of the quality that you created!
Author
Hehe, yes, this was my second go so you do learn from doing it twice! It was a whole lotta work though, yes.
I know this will gross-out some, but if it’s a tiny bit of blood your own saliva will remove it. I know, I know but an experienced quilter told me that and I had the occasion to try it out once – it works! Something about the enzymes in saliva that will dissolve the blood. Of course, if there’s a lot of blood, probably not. Just thought I’d share. :o)
And now I’m really intrigued in trying out the dress form, especially if it comes out as beautifully as yours. Lovely job.
Author
Not grossed out at all Vee 🙂 And it makes sense that it’s to do with enzymes, thanks for the tip and kind words also x
Many thanks Diane, much appreciated. Sorry to hear about Bilbo.
Author
Ohhh, and thank you so much too, Christina.
Oh yes, I definitely have to try this if I want some kind of dressform for the future! Thank you so much for sharing. I didn’t know this existed until you mentioned it. And you’re not alone in losing your sewjo or feeling “off” during this time. I, too, feel that way. It sure is strange and difficult time.
Author
It sure is, very strange times indeed. Thank you for your kind words. And you ought to give this a go, it’s worth the time and effort. xx
I’ve been dreaming about this professional looking beauty ever since you posted it on Instagram. I’m so inspired. I like my shop bought one for displaying clothes but it’s no good for fitting. thank you for all the tips Monika xx
PS: and again, sorry about your kitty. such a horrible time to lose a member of your family.
Author
Aww, thanks for stopping by Monika. Glad you like my new fitting mate.
And thanks for the kind words about Bilbo…I really miss his furry little face being around.
Thanks for this review. I saw that pattern on Instagram too and I’m still sceptical, but your result looks awesome. Maybe I’ll give it a try 🙂
Author
Thanks, Theresia. Yes, it is a lot of work but with time, effort, careful measurements and patience it’s rewarding 🙂
Hi Diane! So sorry to hear about your Bilbo! It’s so hard to lose our family members in general, but right now it must feel expecially rough. Sending you good thoughts. And thanks for the info on the dress form. I’m intrigued and your results look great!
Author
Thank you so much, Linda. He really was one of the family and definitely a momma’s boy :).
Glad you like my dressform too xx
I made this for my daughter. She is getting married in June of next year and I am going to make her dress. I am VERY pleased with how it turned out. The hips are larger than they should be but every thing else is spot on. I think I will try to take so.e stuffing out and see if I can not adjust the hip measurement ti more accurately reflect her size. I am a mediocre seamstress, without much skill. This dress from turned out beautifully. I am going to order a pattern for myself now!!
Author
That sounds fantastic! I couldn’t be more pleased that it turned out well for you. Thanks for the feedback. I hope your own dressform goes well too. And congrats to your daughter 🙂
What choice of..posture..did u choose for bootstrap dress form? Im having trouble deciding which is more like my posture
Author
Hi Eileen. I went for the round back with square shoulders. I am quite rounded in my upper back even though I rarely need shoulder pads in garments. If you click on the little question mark symbol just above the options on the Bootstrap website you can see little diagrams for each posture.