
Hi all! I’m back this week with a new make. I finished this project about 2 weeks ago and it’s the first time I made some outerwear since my olive coat earlier this year… I almost felt rusty with my skills! My DIY cream cropped jacket is a lovely transitional piece and also just happens to be an on-trend silhouette that works really well with all kinds of trousers and skirt styles.
The fab cream fabric came from Sherwoods Fabrics and it’s a 100% cotton basketweave with a feel of lightweight denim and the warm shade with a yellowy undertone works well with the other colours in my wardrobe.
The Vintage Inspiration For My DIY Cream Cropped Jacket
For the jacket design, I used a fabulous vintage pattern from my collection by Nina Ricci which is date stamped 1969. I used the top section of the coat with the high-hip seam as my cut-off point where I added the hem allowance.

Ok, to begin with, a made a toile because I needed to nail the fit really well and I’m so glad I did because I had to do some adjustments for my forward shoulders but also at the back seam and the side panels to get the balance right for the way that I stand. I also made adjustments to the side front panel through my bust. I folded out some excess near my armhole and also added a little extra over my bust depth. Here are 3 photos showing what I did:


Once I got the toile perfected it was a fairly easy jacket to construct, but before I got into the sewing I made a decision to iron a very lightweight nylon interfacing onto every single piece in order to add slight structure and bounce to the fabric, making it less prone to creasing. For the front facings and undercollar, I used the medium weight weft insertion interfacing.
Here are a few construction photos:


I absolutely adore how the design looks on the pattern envelope so I copied the photo and topstitched many of the seams. The funny thing is that it was really tricky to get straight topstitching when I went across the fabric weave but it was easy when I went down the weave. It seemed to be the way the needle straddled the fabric threads…that back yoke seam was sewn six times! Much swearing was involved….lol!
Now, when it came to the collar I decided that the original mandarin style one was perhaps a wee bit formal looking for the vibe I was after, so I decided on a collar shape more in keeping with the sort you see on a denim jacket. A quick rummage in my pattern stash and I found this DKNY coat with just the right shaped collar that I wanted.

I checked the neck measurements of both patterns and just a slight tweak was needed to the collar length. I also made a change to the undercollar by cutting it in two halves and on the bias so that it rolls well. For a nice turn of cloth, I made sure to trim a little off the overall length and width of the undercollar too.
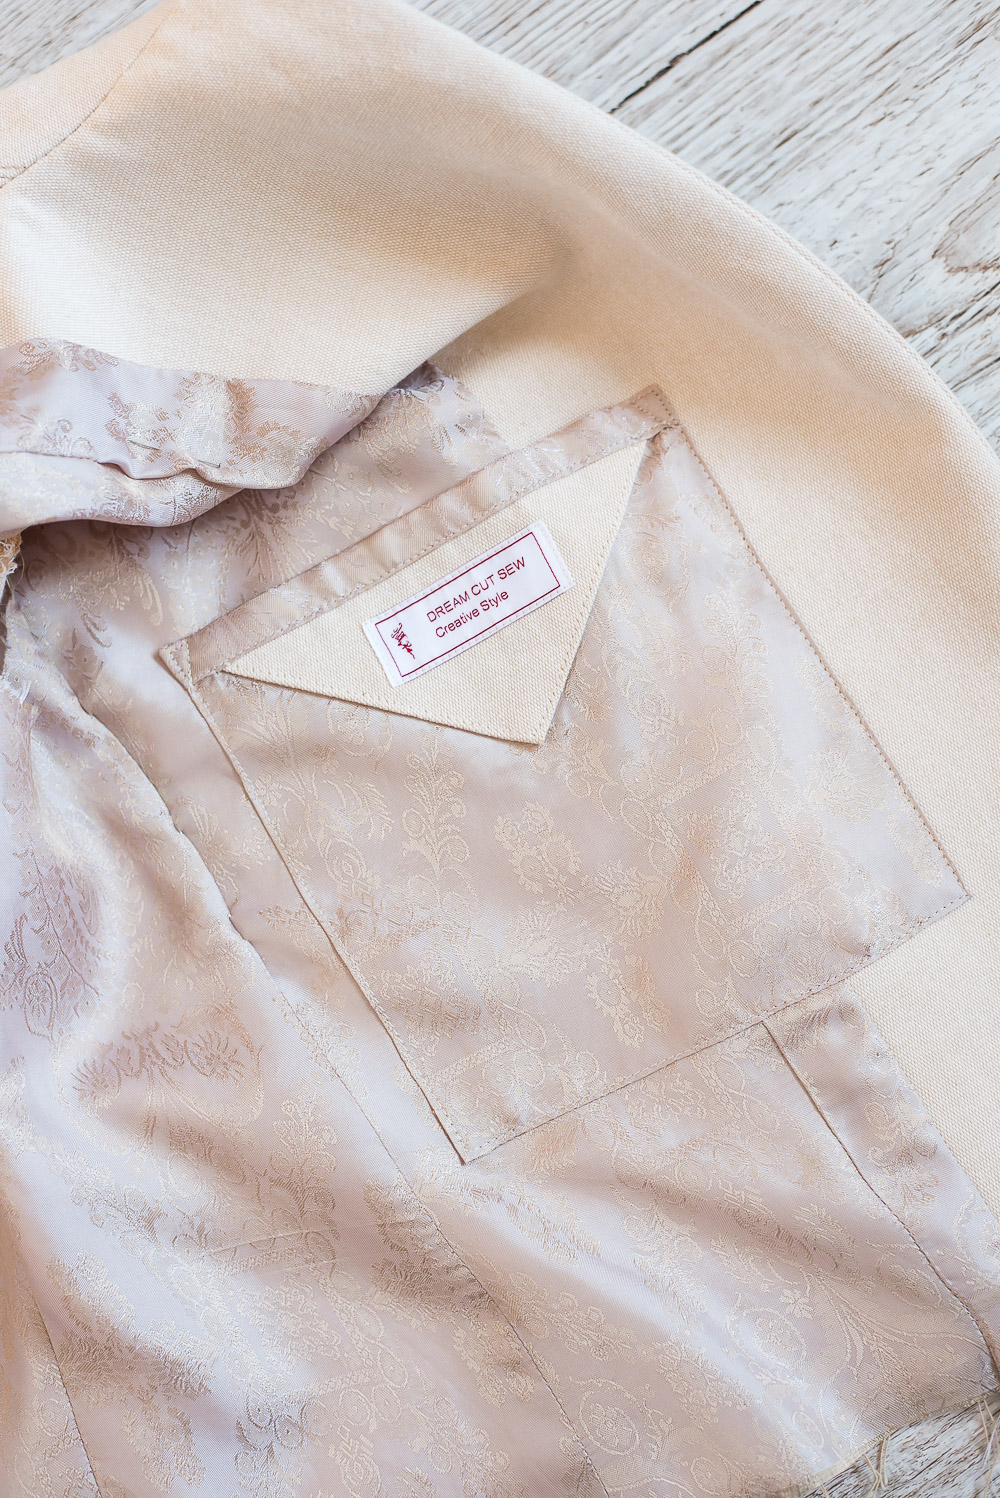
Finally, the lining went in and I used a lovely jacquard acetate blend in beige/blush pink tones which came from Clothspot. Now, you see those pocket flaps in the photo? Well they aren’t actually functioning pockets and I don’t know about you but in my opinion, a jacket just has to have a pocket…so to redeem the style I made a generous-sized inside pocket on the lining which of course had to highlight my label 🙂
Some close-ups for you:


I can’t tell you how comfy this little jacket is and I adore it so much. I’m really looking forward to wearing it before the very cold weather comes.
On that note, I’ll say see ya and I’ll catch you next week because believe it or not I already have two more blog posts prepped.
See you soon!
EDIT/UPDATE:
Since making this jacket I realised that I wanted to change to collar so I remodelled it into a more simple collar stand design that I prefer.


Pin For Later


Really lovely. The changes you made to the design are flawless. Well done! Enjoy wearing this very versatile and beautiful jacket.
Author
Thanks, Karen! I’m sure I will!
Beautiful! Your work is impeccable and inspiring. Thank you.
Author
Thank you so much, Sally, that’s lovely of you to say.
Gorgeous! I enjoyed reading this post.
Author
So glad you enjoyed it, thank you, Jane!
Diane, That jacket is the bomb!!! So classic, elegantly detailed, but sporty. I love your using the Nina Ricci pattern features but dropping the peplum and changing the collar. Really love the design lines of this jacket, the faux pocket flaps, your interior pocket (so practical and nicely detailed) and your sleeve hem detail.
I would love to sew as well as you do, and appreciate your fitting and sewing details!
Author
Ohhh, thank you so much, Joan! It really was a lovely pattern to use. I’d love to use it again too!
Really love this make. I’m disappointed it wasn’t a modern pattern that I could make. You did a great job and looks fabulous on you.
Author
Ahh, thanks, Suzanne. Yes, sorry it’s not an available modern pattern…though you never know, there may be a second hand available somewhere.
Another lovely garment that you must feel so pleased and proud to wear. You make such beautiful pieces with such great skill!
Author
Thanks for such a lovely comment, Kathy!
Another beautiful project! Thanks so much for the details and more inspiration.
Author
Ohhh, thank you so much, Leanna!
A fabulous little jacket that looks so comfortable and has some beautiful style lines. Thank you for adding your pattern adjustments as I like to understand the fit.
Author
Thanks ever so much, Sharon. Yes, it was the lovely style lines that sold me on the pattern.
Stunning!
Author
Ohhhh, thank you, Vicki!
Beautiful jacket. Thank you for explaining how you went about it including your pattern alterations. Helps me to understand what I need to look at when making.
Author
Thanks so much, Christine and for your lovely feedback x
Great workmanship! Do you pre-treat your interfacing in any way before attaching it to the fabric?
Author
Thank you! I do sometimes pre-treat my interfacings, It depends on the interfacing…I did nothing to the nylon one but the weft insertion one I dipped in lukewarm water for a few mins. It’s worth checking with the retailer. I once pre-soaked some cotton iron-on interfacing that I got from eBay and lots of glue came off! Some of the Palmer/Pletsch Perfect Fuse interfacings can be pre-shrunk (it specifically says on the packaging). Ultimately I suggest you test a scrap first.
Hi Diane,
Your sewing skills are amazing, everything you make is impeccable. I have bookmarked your instructions for forward rolling shoulders.
Author
Thank you, Andrea! That’s so lovely of you to say.