
I fell in love with this fabric from Cotton Reel Studio when I first saw it on Instagram. I knew it had to be mine, the minute I saw it. A lot of my favourite colours are in it and of course Dragonflies! What’s not to love? I also knew when I bought it that it was destined to be a top, but no idea what style of top. Then, of course, Sleevefest started and as part of my research, I browsed lots of images of gorgeous sleeves. The two images below started the germ of an idea growing and I decided I wanted sheer inserts on a bell sleeved top. I had some sheer ivory georgette in my stash and thought why not give it a go?
 Valentino RTW Autumn/Winter 12/14
 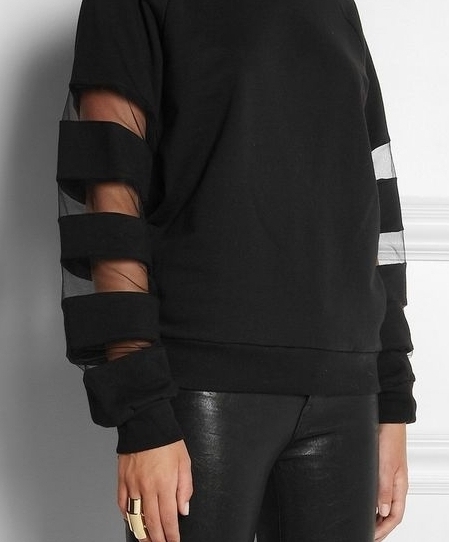 Top by TNTees found on Net A Porter
I really didn’t want to break up the lovely design of the fabric too much so I settled with the design I drew in the next photo. A sheer band around the neck and hemline and some bands across each sleeve with the sleeve having a subtle bell shaped flare at the bottom.


Now, please don’t groan and say…”What? Again??” because I’m about to tell you that the pattern I used as a base for this was….wait for it…..New Look 6364. I just find it useful and it fits…and I bet you have a pattern that you do this with too, so there 🙂
I just want to begin by explaining my sleeve pattern hack. I laid the sleeve pattern piece on some paper and drew down to make it full-length. I then cut the bottom section off at elbow level and slashed and spread the pieces for a slight bell effect. Then I cut my new pattern piece and I was ready to get going on the making.


For the inserts, I used some creamy coloured fine georgette that I got from Stone Fabrics. In order to be accurate with sewing in the georgette, I needed to do lots of precise marking. Now, I suspect that many of you already know of the marking tool I used, but it was a completely new experience and quite a revelation for me…I’m talking about Frixion pens. It’s as if by magic, but any marking that you do on fabric just disappears when ironed! Consider yourself warned though…be sure to test this out on the fabric you’re going to use before going crazy marking everywhere. I tested mine and it worked fine. It should be fine on most fabrics, to be honest, but better to be safe than sorry eh?. Oh, and by the way, I remember reading somewhere that it’s possible for the markings to come back at very, very low temperatures, but let’s face it…we won’t be wearing our memades in the Antarctic…or will we?? *****
Anyway, back to my top…I decided on the width of each sheer part and marked each one on the wrong side of my fabric. Then, making sure to true up the grain of the georgette, I laid it on top, pinned it in position and copied off the markings (the georgette acted like tracing paper). I carefully added little marks for matching up at intervals along each dotted line on both fabrics and added seam allowances to the georgette. The cotton fabric was just cut through in the middle of each marked section and the dotted lines were to act as my stitching lines. I wasn’t taking any chances with the process of sewing in the inserts, so I carefully pinned and basted every single piece. I really enjoyed the slow careful pace.


When I finished the inserts I stitched the rest of the top up in the usual way, overlocking any raw edges. I wanted a little bit of subtle shaping at the waistline so I added a concealed zip in the side seam which opens up to just under the armhole and makes it easier to get on and off. The neckline was finished off with a narrow interfaced facing which I slip stitched in place on the inside along the edge of the georgette.


So that’s my latest make, I hope you like my bell sleeved top. I really enjoyed getting to grips with working with two completely different fabrics and I’m pleased with how it turned out. I think taking my time to enjoy the process rather than just wanting to get it done fast was key to achieving the finish I was after.
***** And finally….you remember what I said about the marking pens and cold climates?

And with that, I’ll say goodbye and see you next time!
Pin for later!


The top is just perfect on you Diane, and why not use a pattern you know will work as a base for your hack? No groans at all 😉 Plus, the penguin doodle is too funny!!
Author
Thanks so much Helen. And for not groaning 😁 I’m glad you enjoyed my doodle 👍
İ really enjoyed reading this blog and checking every photo you uploaded about this top. İt hangs on you perfectly and the concealed zip insertion look so good. You should be proud of your self.
Author
That’s kind of you to say Ersan. Thank you!
Ianother really interesting post Diane…oh, and I think you should totally put the penguin illustration into a T-shirt!
Author
Haha! I totally should! And thank you Sarah xx
How lovely! I really love it. It looks great on you.
Author
Thanks so much for the kind words Eli cat x
That is just lovely! I love the bell sleeve. It’s great when you can make whatever you want from a pattern, just by adding bits of paper here and some inserts there. Nicely done – the top and the drawing! 🙂
Author
Thank you Linda! I just love to get creative with patterns and put my own spin on them. In fact I can barely remember the last time I just made a pattern as it was designed 🙂
What a gorgeous top! I love how you made the sleeves. And I’ve never heard of a Frixion pen, I’ll have to look for them next time I go to the fabric store.
Author
Thank you so much Karie. Yes, the pens are great. I hope you manage to find some
Really lovely top, Diane, and thanks for the thorough tutorial! Also love your Frixion cartoon! Did you go to art/design school? (I did, and I can’t draw nor sketch clothing designs worth beans!).
Author
Thank you, Joan. Yes, Frixion pens are useful arent they? And I did go to art school…good guess! I still have all of my art folders from there. I don’t seem to sketch anymore though, apart from when I’m planning a new garment.