
Before I talk about my latest Summer make, I want to say a great big THANK YOU to all you lovely people that read my blog regularly, by whichever means you like to keep track of my posts. I’ve been getting some great feedback lately and I really appreciate your support.
However, I guess I’d better get on with the real reason you’re here and that’s to get on with this post…

So, on to my new top. I’ll be totally honest here and say that I got the idea for this flouncy top from the lovely Emily of Emily Hallman Designs. She made some really fab tops from Vogue 8745 which is unfortunately now OOP, so as I couldn’t get hold of the pattern (yes, I tried eBay), this is my take on that style and with my own slightly different ways of sewing it up, which I’ll be sharing here. Also by all means go and read how Emily made hers too.

The fabric I’ve used is a lovely drapey viscose that I bought from Pound Fabrics in Birmingham when I attended a fun fabric buying meet up with some fellow IG sewists. It was lovely to sew with and feels really nice to wear. The shape of my top is basically a sleeveless shell with a circular flounce added to the neckline. For the body pieces, I used the pattern that’s recently been my ‘go to’ basic top pattern which is New Look 6434. It just seems to fit me without much altering, so if it ain’t broke don’t fix it…
The first thing I did was to stitch and overlock the shoulder seams, then I got two lengths of bias cut fabric, folded double and stitched them around each armhole. Next, I just folded them completely underneath and stitched them down.


Side seams were next and then onto the good bit…the flounce
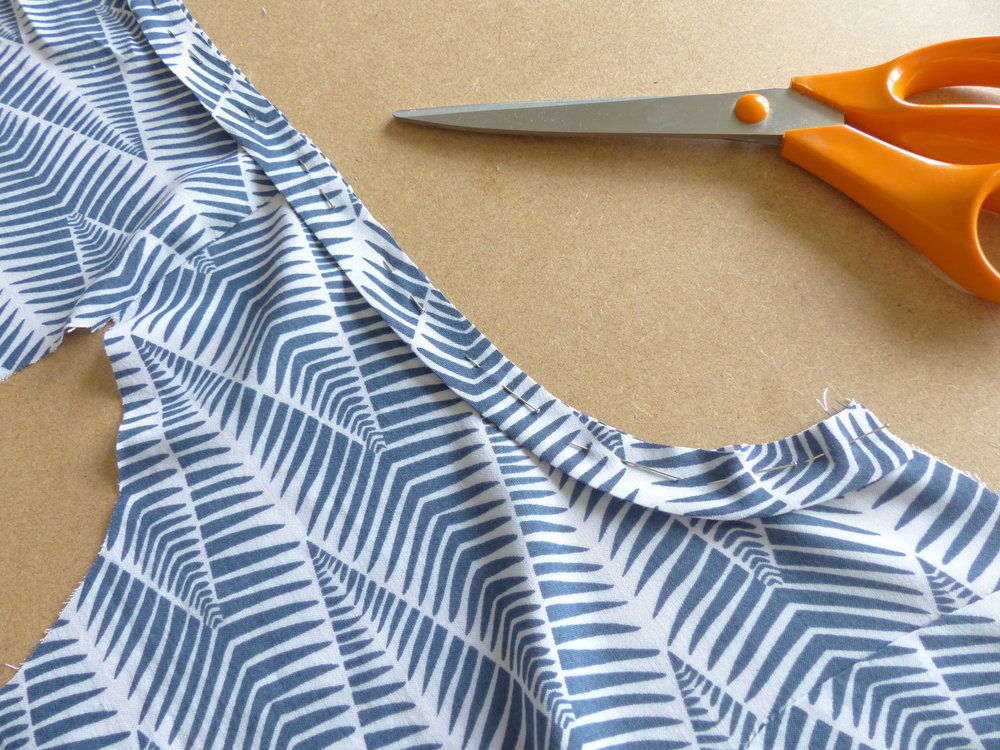
At this point I should say that I was a bit short of fabric because when I bought it I originally planned just a sleeveless plain top, therefore I couldn’t cut a full circle shape for the flounce…what you really need is a doughnut shape of fabric with the inner circle circumference measuring the same length as your neckline…my circle was a bit flattened and I hadn’t got much fullness at the CF of the neck (I added a bit of a tuck effect in the middle to help with that)

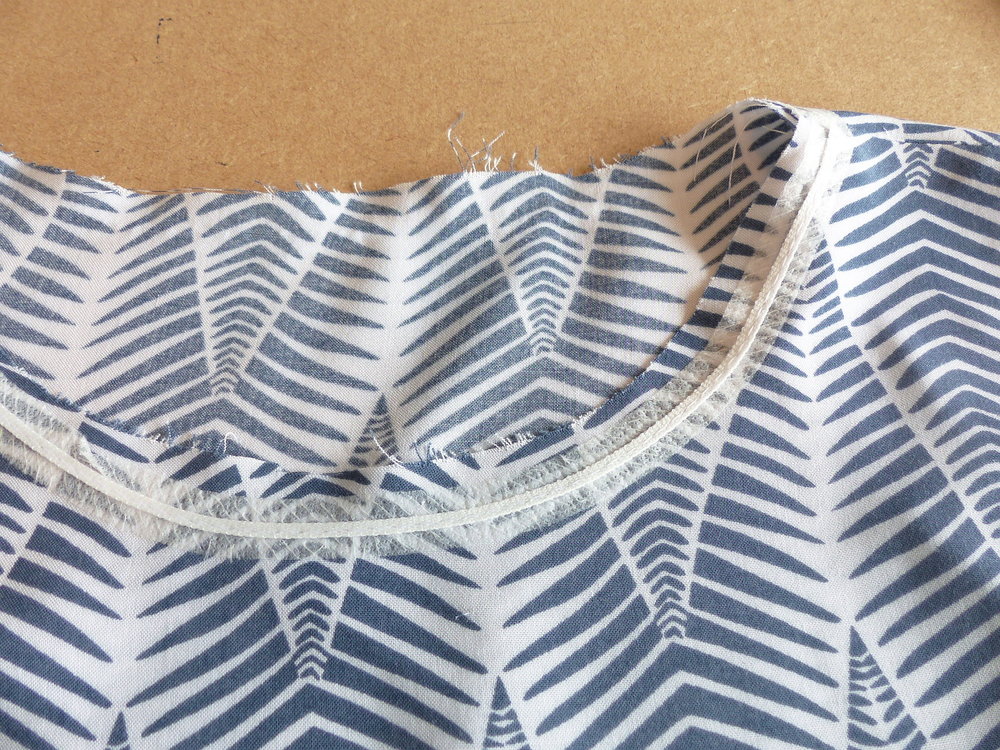
Before attaching the flounce I stabilised the neckline within the seam allowance using iron on stay tape. I actually applied this tape to the right side of the fabric because of the way I attached the flounce, which was to put the right side of the flounce to the wrong side of the body fabric. Stitch all around the neck and then overlock and clip into the curve a little. Finish with understitching that is actually done on the body fabric.

How to roll hem on an overlocker
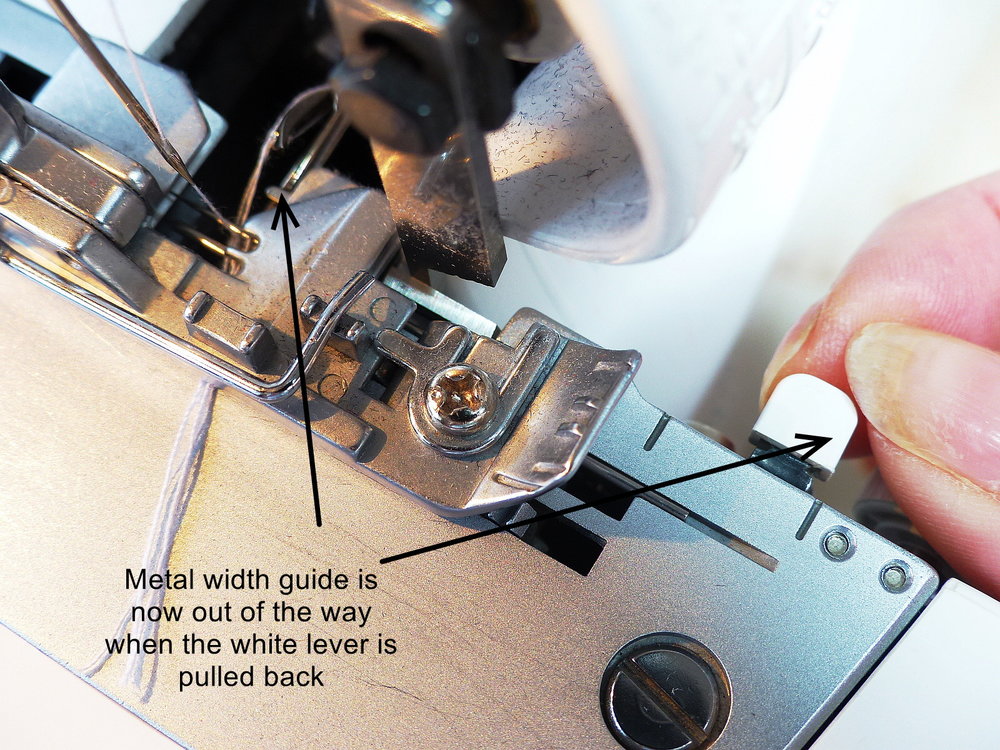
I finished off the edge of the flounce by doing a roll hem effect using my overlocker. I know some sewists have never attempted this, so I thought I’d just go through the process now in case you fancy trying it for yourself. Obviously, the instruction book that comes with your machine will most likely refer to the process and some machines may have a slightly different set up to mine which is a Bernina 1150MDA
- The first thing you need to do is set up with three threads… in the first needle and upper, and lower loopers.
- Next, you need to set the tensions on the loopers….the upper looper should be a couple of numbers lower than you would normally use for plain edge finishing…the lower looper needs to go tighter by about the same amount.
- Set your cutting width at maximum or thereabouts.
- Set stitch length to almost the shortest setting, because you want the effect of a close satin stitch.
- The final step is to move the little metal guide next to the needle plate that regulates the stitch width so that the fabric can roll. Hopefully you can see mine in these photos:

Practise roll hemming on some fabric scraps first, because each fabric behaves differently, and try tweaking the tensions on your loopers or the cutting width until you get the desired effect. What you should see is the fabric edge rolling under and the upper looper stitches going right underneath to the wrong side where the lower looper stitch width should look really narrow. See what I mean on this photo.

The best fabrics suited to this hemming effect are lightweight drapey ones or sheers and if you want to get a frilly lettuce-edge effect, try setting the differential feed to create more stretch as you stitch.
I really like the look of a rolled hem done on an overlocker and once you’ve mastered the technique it’s quick to do. You can do the bottom hem of a top in the same way if you want, though to finish mine off though I decided on one row of machining.


And there you have it…quite a quick and satisfying project. I hope you like it!
Pin for later!


love it, thank you for the tips xx
Thanks Monika! Glad the tips prove useful 😊
I love this top and your explanation of the construction details. And congratulations again on your top 100 spot!
Ooh good, I’m glad my explanation is useful, Helen. And thanks for the congrats x
I love this top and the fabric is gorgeous!
Author
Thanks so much Faye. The fabric feels fab to wear too.