
After sharing my latest pants sewing project here I decided to revisit my self-drafted slim pants pattern in search of the Holy Grail of pants fit. So today I’ll tell you the story of my adventures in pants fitting. Are you sitting comfortably? Then I’ll begin 🙂
‘The Great Pants Saga’ started a few years ago when I had a pair of RTW pants which fitted me fairly well (not perfect but ok). Granted they were made in stretch Ponte fabric so maybe they were a bit more forgiving in fit but I decided to take a pattern off them.
I originally made two or three pants mockups and the final outcome was a reasonably well-fitting pattern which I used quite a bit and I ended up sewing several pairs (some were more successful than others). Over the next few years, however, I tweaked the design here and there and as a result, I gradually noticed more and more fit flaws. I was also learning how to recognise the little anomalies of my body shape and was beginning to identify what was wrong with the fit of my original pants
After yet another not-quite-right make I decided once and for all to start out afresh and do battle with the pants fitting demons.
My Personal Fit Issues
I’ll start by explaining the fit problems that I was seeing and feeling:
So, I have knock knees and these cause draglines that angled towards my inner knee area. I also stand with my knees pushed back (I’m a bit hypermobile) and this makes the lower back hemline poke out.
I have quite a low bottom and although I’m not blessed with much real estate back there I often felt like I didn’t have quite enough sitting room. My waistline is also angled and is a lot higher at the back so obviously, I need more depth back there.
The front crotch line never felt right. It was as though the fabric was pulling together at the area around the bottom of the zip and width needed to be added at that point.
Pattern Drafting Fun
My drafting adventures started off by making some adjustments to my original pattern. I made sure to check and align the grain lines and did a knock knee alteration. Many thanks to one of my regular readers who very kindly sent me some images for knock knee adjustments. Thank you Joan!
There are a couple of ways to do the KK alteration. One is simply to add extra width to the inseam area (recommended in the Palmer Pletsch book Pants For Real People) and another way is to divide the pattern at knee level and to move the lower section inwards and then to true the outer and inner seams. My first toile after redrawing my pattern wasn’t quite right. I could see an improvement but I still needed to do a bit more of an extreme knock knee alteration. And the front crotch line wasn’t right either. I ended up doing a second toile and then some further adjustments after that as well well. I also did a pattern adaptation for the lower back leg which involved dividing it in two vertically and creating a curved seam for calf shape.
My List Of Fit Adjustments
These are all the adjustments I used in more detail with some pattern images at the end:
- Waistline…I scooped it down at the front and kept the back quite high.
- Front Crotch Curve… This is now a very, very shallow curve. I’ve found out that it’s called a flat pubis adjustment (a charming title!)
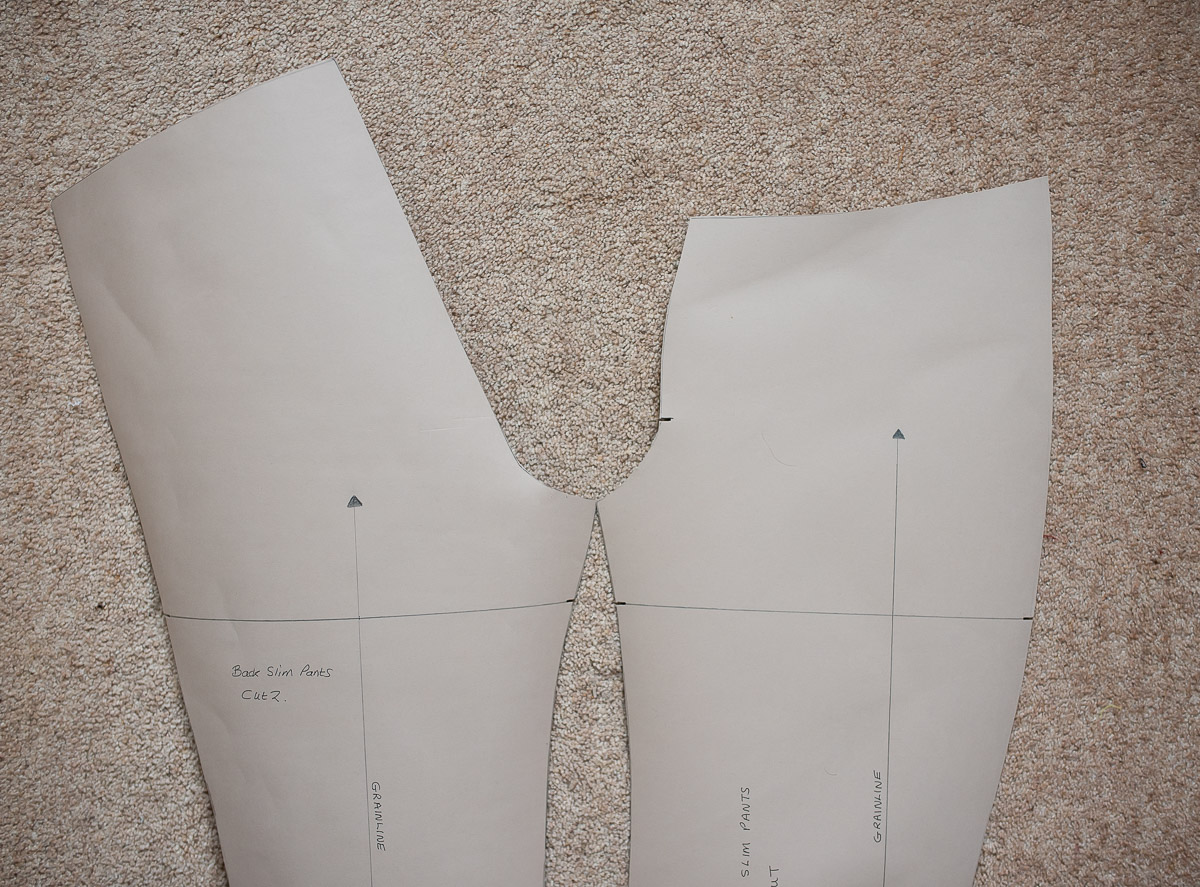
- Back Crotch And Back Seam…The crotch curve is fairly shallow and the back seam or fork as it is sometimes called is at quite an angle to accommodate my low bottom and give me room to sit down. Skinny or slim fit pants always have angled back seams. On a wide-leg pant, the seam is usually much straighter.
- Knock Knee Adjustments…I decided to just use the simple method of adding quite a bit more width at the knee area on the inside leg.
- Side Seams….I hade to bring my side seams in towards knee level in order to follow my thigh curve and to bring the leg angle in after the knock knee alteration on the inside leg.
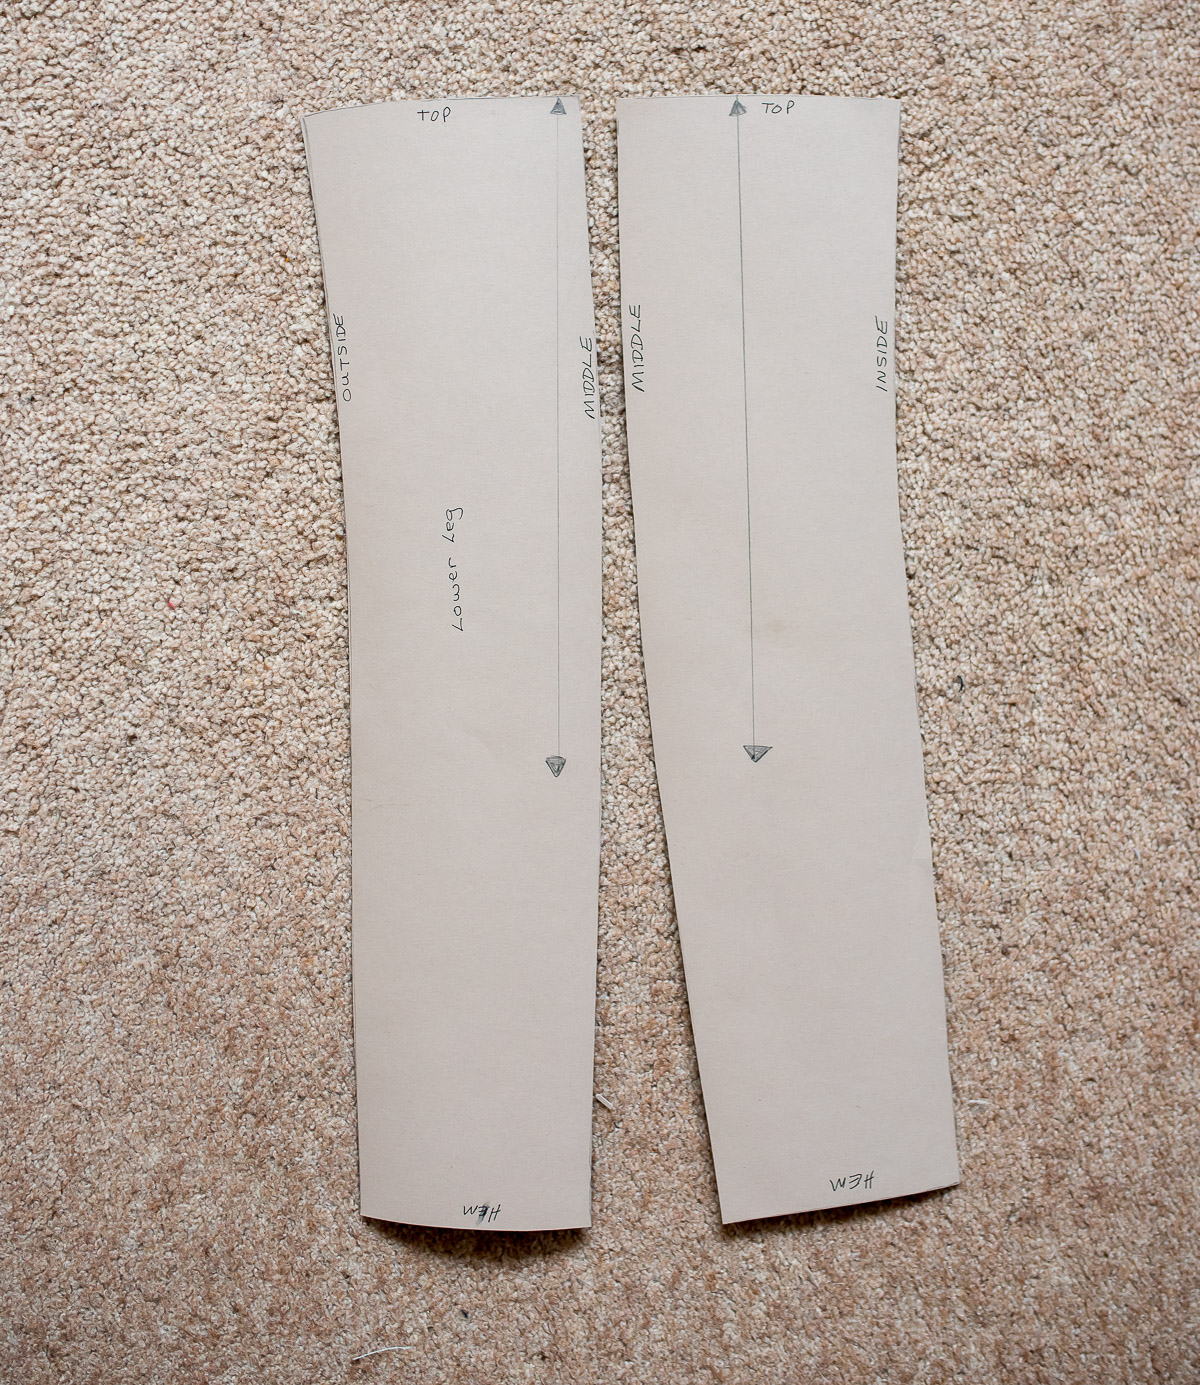
- Back Calf Shaping…I mentioned that I stand with my knees pushed back and it makes the hems poke out at the back. To fix this I divided the lower back leg down the middle from knee level, then I slashed and spread both sides just a little amount. The slashes were concentrated mostly around the middle area. I then traced off the new shapes and transferred them onto cardboard. The lower leg at the back now follows the shape of my calf by curving back in.
Here are some photos so that you can see the shapes of my pattern pieces:


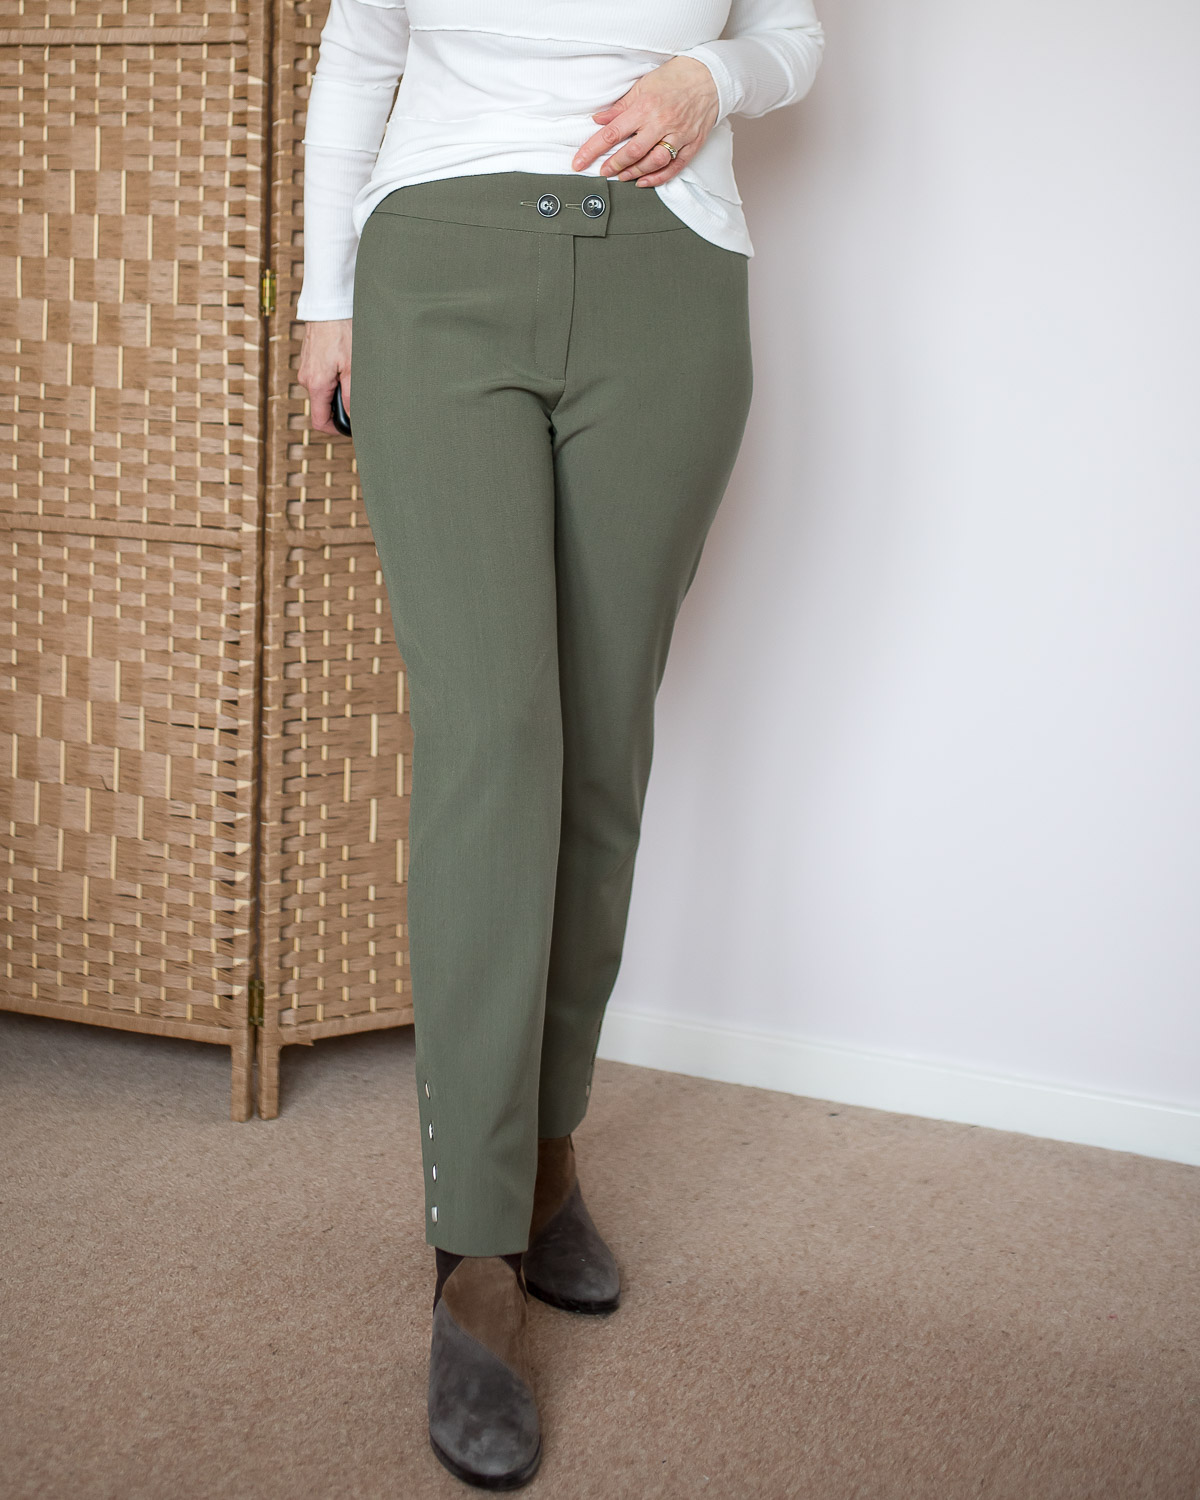
Ok, so now that I’ve told you all about the pattern. I have actually made it up and tried it out, and for that, I used some olive green viscose/poly blend fabric with a little bit of stretch. I bought it from Clothspot last year.

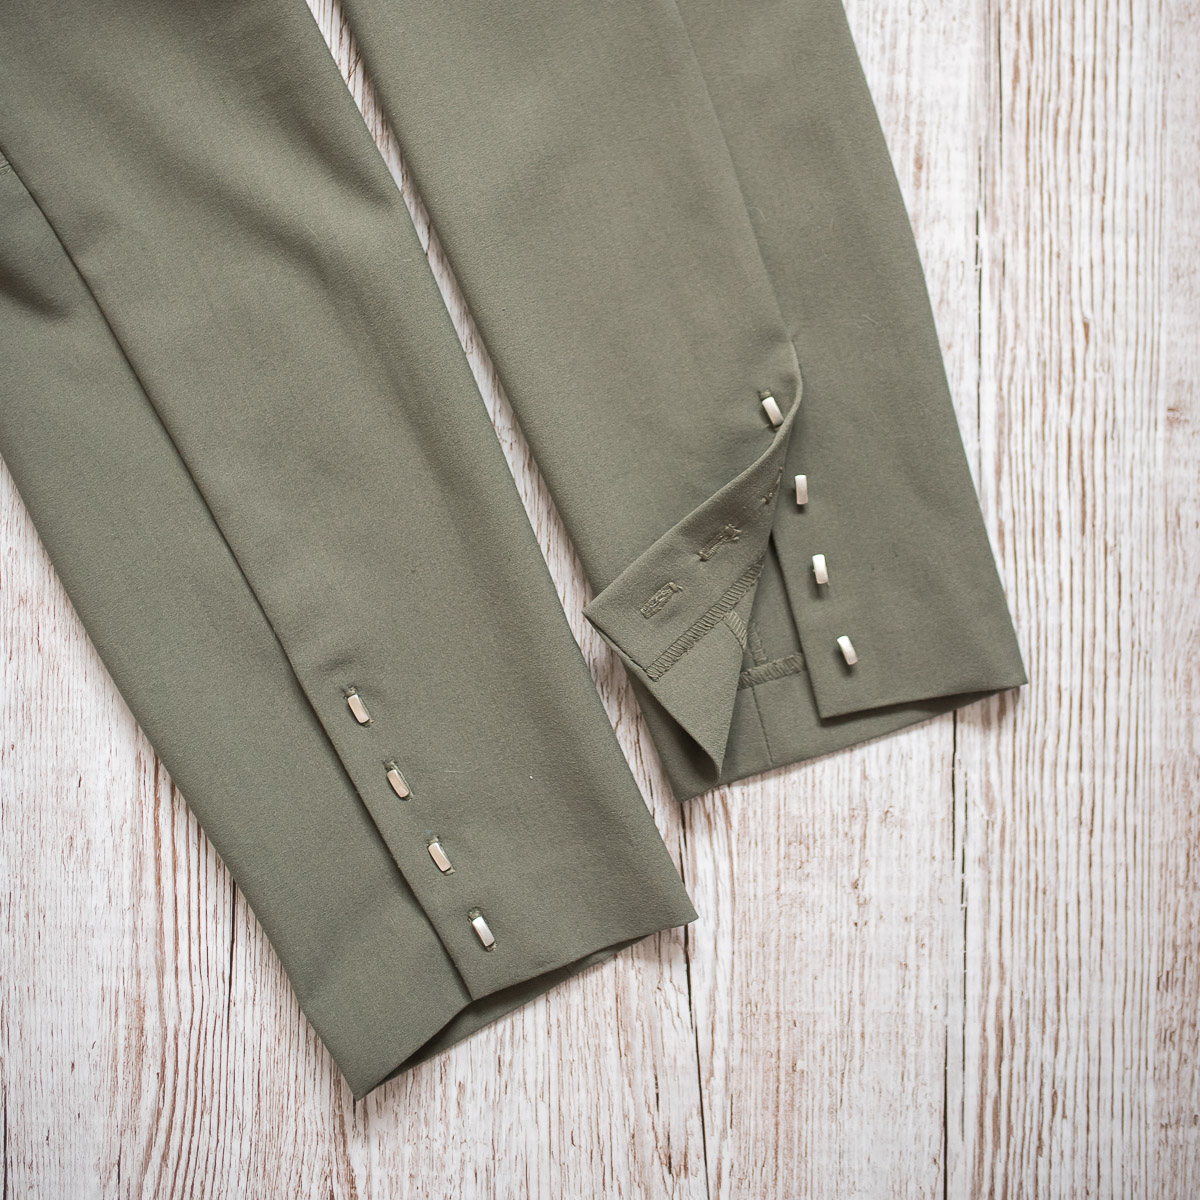
I’ve done a zip fly fastening and created a slightly curved waistband (I think I prefer this type to just a straight one). On the inside I’ve added a lovely pop of colour with some crimson binding around the band and the zip guard. The final finishing touch, though, is a button detail at the ankle. It was fairly easy to do…just a matter of adding a fabric extension several linches up from the hemline and then making some buttonholes. The buttons came from Totally Buttons.


So the verdict? Well, I have to say that overall I’m quite chuffed with the outcome. I will be doing another very slight adjustment to the angle of the back legs on my final pattern because I feel that I might have done a smidge less of a knock knee alteration than on the front legs. I still need to straighten the front crotch curve a bit more too.


To be honest, though, I think I’ve become way too obsessed with trying to get rid of every. single. little. wrinkle. I mean, realistically, when you put fabric around a human body and they move around there will always be a few wrinkles appearing here and there. We have to move and sit don’t we? So I’m going to do those final few adjustments and then call this a victory. So please excuse me while I do a little happy dance!
**Footnote…it’ll be interesting when I eventually cut into some grey stretch denim to make some more pants. A slightly stiffer fabric will definitely make a difference. You’ll be the first person I show them to, so you can be sure I’ll let you know how it went.**
Well, I hope you enjoyed my pants pattern adventures and maybe discovered some useful tips too. I’m actually carrying on with the theme of fitting next week so be sure to pop back for that won’t you?
In the meantime I’ll be taking a break from pants and sewing a couple of tops instead. See you soon!


Great information. I am planning to draft a pants sloper, with the help of Craftsy classes and I think my ultimate goal is to be able to compare my sloper(esp crotch area) to patterns I like and adjust pattern in that area to match sloper. Do you do this? In your opinion will I need different slopers for narrow pants, wide leg pants and knit pants? I don’t think my calves poke out due to my stance, but I often have fit issues in that area because they are bigger than the norm , at least in narrow fit calves. Do you think your adjustment would work for me? Note: This is your first adventures in pants fitting article I have read.
Author
Hi Mary, welcome! Yes, I often compare the crotch line of my own sloper to patterns that I’ve bought and then I can adjust them a little to suit me.
My calf adjustment would definitely work for a larger calf though you may need to add a little extra onto each middle seam line in a gentle bowed curve.
As for different slopers…yes you’d definitely need a separate one for wide-leg pants. As for a stretch pant, most likely yes, if you’re going to use a very stretchy fabric. My sloper will only be used for wovens with a bit of stretch or a fairly stable Ponte and I have a separate sloper for wide-leg pants(which I need to re-do a bit)
Well done, they look fabulous.
Author
Thanks ever so much, Vicki!
Thanks so much for the pattern journey. I too started from a RTW pattern that I adapt every single time, but also because my body measurements changed over the years. It is of course very nice to loose weight, but bummer, you have to change te pattern again. I wonder if you will declare your pattern finished or wil keep changing it. It is part of the fun to make it fit just a bit better.
I would like to learn more on adaptations to different fabrics. Trousers feel very different in different fabrics.
Your trousers look fab!
Author
Hi Jos. Thank you! Glad you enjoyed my post!
I think I absolutely will keep changing and adapting my pattern as I go. Pants/trousers are such a tricky garment and as you say, each fabric is different too. I will be making up some midweight denim with stretch in this pattern and I’ll be interested to see how that goes. I don’t think they will be made for a couple of weeks or so, but I’ll definitely report back on my blog about my experience with different fabric.
Morning Diane, I am in awe of your patience and talent to get the perfect fit for you. Your pants look fabulous on you. I will look at pants quite differently now. I am even more astonished that retail makes pants for the masses of different body types and nuances. Thanks, always appreciate your detailed posts.
Author
Thanks for the kind words, Pat. Yes, retail just makes for the masses and it’s the lucky ones who can just put on a pair that fit off the rack…that sadly was never me as there was always something off. I’m glad I managed to muster the patience to tackle my pants fit and wrestle those demons 🙂
To see your name in my inbox always gives me a bit of excitement. I very much enjoy your style, garment selections and details. My body is pretty much opposite of yours, but your information is fabulous. Thank you.
Author
Ohhh, you’re so kind, thank you, Marlene! I’m so glad to have inspired you, it makes my day x
Thank you Diane! I am in awe of your sewing adventures. I haven’t seen for years but your patience for getting a good fit is inspiring! I quit seeing when my body didn’t fit the ready made patterns. Your journey makes me think it is possible. I especially love these pants, your tartan jacket and that beautiful coral colored blouse! Always look forward to your next post! Thank you.
Author
That’s lovely of you to say, Karen. Thank you so much!
As a person with “crotch oddities” I feel your need to make these adjustments. It’s interesting though that I’ve never noticed any of the flaws you’ve pointed out. Your trousers always look perfectly fitted to me, but these do look very sharp. I love that button detail and have filed it away for a bit of blatant copying!
Author
Haha, “crotch oddities”…yup! Thanks for your kind words and feel free to copy my button detail 🙂
Hi Diane,
I love your sharing your alterations journey in detail: it is much appreciated! These slim pants are beautiful and as always, you add elegant details for quality or fit: the binding on the waistband edge to keep it thin and add style, your functional hem opening/placket, and your fitting seam to accommodate your calves: all of these really add a lot!
Do you find your pants comfortable? Always a difficulty for me: what looks amazing feels snugger than I wish!
And I completely agree with you on trying to eliminate every wrinkle: I have fairly modest expectations for fit in RTW, yet my fit expectations for what I sew seem boundless (and tedious) ;-}
Can you tell us what interfacing / support you typically use in pant waistbands?
My “bum” is low and fairly unpadded, too, so I am very interested in your pant fitting:
I am struck by the shape of your front and back crotch curve and the length difference between F & B crotch (the length of your back piece from waist to crotch point if measured straight up & down, as compared to your front piece), as it cannot be seen on your figure. Also, I am struck by how short your crotch point is on your back pant pattern.
I remember that when Burda Patterns made a big splash in the 90’s (long ago!), everyone was very happy with their pant patterns as compared to the American Big 4 of the time, because Burda had a deep and long crotch curve, and Vogue had a shallow and short one! Everyone felt the Burda pant fit was so much better! The Vogue norm around 2000 was similar to your pant crotch curve, by eye, at least.
All that said, in the last 20 years, we have moved toward more and more stretch woven fabrics and 4-way stretch fabrics for comfort and a closer fit in a slim pant style, which has changed the curve lengths and F & B crotch points: crotch points have become a lot shorter (and look shallower) because the inner thigh is fitted more closely in slim-fit styles and the stretch fabrics do a lot of the work and “fitting”.
So, I just got out several RTW pants of mine to compare with your F & B pieces…I have a heavy knit pant (‘denim jegging’, but a knit, not stretch denim) and its F & B curve look very similar to your new pant pattern, including a lot more length in the B pattern at center back seam. But another stretch woven pant with more room in the inner thigh looks more like the old Burda pant with a long back crotch point and deeper curve, and both fit me!
All of this to say that the newer fabrics with varying stretch really can affect one’s pattern (particularly in the crotch) and the fitting process! With each different fabric, fitting will likely be required in that crotch point and inseam (not to mention waist and hip).
Author
Glad you enjoyed my post, Joan! Yes, these feel really comfy, I think I got the amount of wearing ease about right.
Wow, that’s so interesting how you compared those RTW pants crotch lengths. I think you’re absolutely right that with all of the new fabrics available now the styles really have altered in the cut. And funny you should mention the Burda and Vogue comparison because I’ve never had any luck at all with Vogue pants. Burda slim pants patterns are a bit better but still not perfect, however, Burda wide-leg style pants fit me much better in the crotch curves without too much alteration. There’s quite a difference with the back and front length on my pattern because I always have my front waistline finishing below my naval. I can’t bear to have waistbands strangling me around my middle, so I do scoop it down a bit lower that might normally be the case.
Oh yes, you asked about interfacing…for these pants I used a scrap of fusible weft insertion in a medium weight, I think it may have been leftover from a pack of Palmer Pletsch Perfect Fuse Tailor (which I can’t get anymore…’sad face’). I only used it on one side as I didn’t want my band too stiff and it suited the thickness of the fabric.
Thank you for the info, Diane. I’ve been thinking about purchasing some of the Palmer Pletsch interfacings: did you particularly like them, or was it their ‘Tailor’ weight, in particular? Was it previously distributed in the UK and no longer?
My waist expands a lot from a.m. to p.m. so the waistline interfacing, ease and location on the figure is always a big factor for me.
I had good luck also with the Burda wide-leg style (crotch fit) and think I worked from a Burda for my slim pant, but will need to look. In any case, I will have to work on revising my basic slim pant pattern when I get my weight more under control (will wear the RTW I own in the meantime…). Thanks again for the informative post!
Author
Joan, I love the Perfect Fuse interfacings and I’ve used several types and weights. For ages, I couldn’t get them, but I’ve just done a quick search and they’re back on Sewdirect.com…yay! I did find something a bit similar on Tailormouse in the UK, but I’m sure I’ll be getting more Palmer Pletsch interfacings.
I enjoyed reading your post, Diane. Well done! Your pants look great.
Author
Ohhh, thanks ever so much, Hana!
Thank you for sharing. I have always been in dilemma when altering pants as I have read that the hem should be perpendicular to the hemline. I see yours is not. Reading books and watching videos would always tell me that this should be aligned, that should be parallel, etc. etc.
I see now that we do not have to follow those old rules. 😊
Author
Hi Mitzi. Well in my years of sewing I’ve also worked as a dressmaker for others and taken on private bespoke commissions as well as altering clothes. I’ve altered a few pairs of high-end men’s trousers and in shortening them I noticed some had slightly angled hemlines that dip a tiny bit at the back. But I say go with what works for you. I don’t always dip my hems, so it kind of depends on the trouser style and leg width.
PS: I did a quick Google search and asked about military hems because that’s where I think it all originates from and this was the reply I got…
“Yes, military and formal uniform trousers often feature a slight slant known as a “military hem” or “guardsmen’s hem,” which is longer at the back than the front. This is done to achieve a clean look with minimal break at the front while ensuring the back of the hem covers the heel and doesn’t “flap in the breeze”.